July 13th, 2009

Lovely Lemon

I used to dislike lemon desserts; they just seemed like a giant waste of time. If I wanted something sweet, I would go for chocolate, smooth and creamy, every time. But as I got older, my palate as well as my appetite grew. I learned to appreciate the delicacy, the brightness, that puckery twang of a good lemon dessert. And now, many years later, I even crave a little bit of lemon zest in my sweets. Chocolate may be tried and true, but lemon is clean and lustrous.

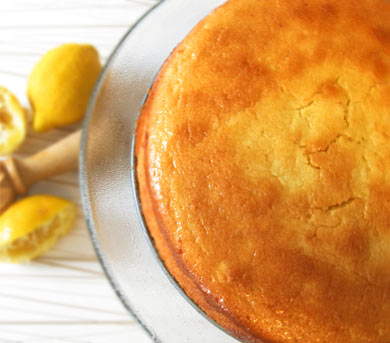
When glancing at a recipe, there are some that read only like a list of ingredients. Nothing about it calls out to you, beckoning from the stove. Then there are the recipes that are utterly enticing. You make your ways through the basics: a bit of sugar (got it), some flour (yes?), buttermilk (mmm), lots of fresh lemon, and a bit of lemon (now you are walking to the market!). That was precisely what happened to me when I looked at the recipe for Meyer Lemon Cake in Chez Panisse Cooking.

The cake is essentially a genoise batter. Eggs are separated, the yolks beaten with sugar until pale and buttery yellow, the whites beaten until stiff peaks are formed, and then added to the rest of the batter. Oh… and don’t forget the stick of melted butter, how else would the cake become so rich and delicious? This cake is subtle, with a fine crumb, with a texture that is reminiscent of a fine silk blouse. The cake was topped simply with a glaze of lemon juice and confectioners sugar. The glaze soaked into the warm cake leaving behind a soft sheen.

I couldn’t find Meyer lemons here in Connecticut, but I couldn’t let that prevent me from making this delectable cake. The heartier sister, the standard lemon was a fine substitution.

Meyer Lemon Cake
from Chez Panisse Cooking

for the cake:

8 tablespoons unsalted butter
4 large eggs, separated
1 1/4 cups sugar
2/3 cups buttermilk
1/3 cup Meyer lemon juice
1 tablespoon Meyer lemon zest
2 cups cake flour
1 1/4 teaspoons baking powder
1/4 teaspoon salt

for the glaze:

1/3 cup Meyer lemon juice
1 2/3 cups confectioners sugar

Preheat the oven to 325 degrees.

Melt butter in a saucepan, set aside to cool. In a mixing bowl, beat together the egg yolks with 1 cup of sugar, until thick and light in color. Beat in the buttermilk, lemon juice, and zest. Sift together the cake flour, baking powder, and salt. Beat the egg whites until soft peaks are formed. Add the remaining quarter cup of sugar, then continue beating until stiff peaks are formed.

Alternately fold half of the flour into the egg yolk mixture, followed by half of the egg whites. Fold carefully as not to deflate the batter. Repeat with remaining portions. Take approximatelycup of batter and stir into the melted butter. Gently fold the butter mixture into the cake batter. Pour into a buttered, and floured, 9-inch cake pan or springform pan. Bake for 50-60 minutes.

While the cake is baking, make the glaze. Combine the lemon juice and confectioners sugar. Heat in a saucepan just until sugar is melted. Set aside until cake is done.

When the cake is done baking, cool for 5 minutes in pan. Turn the cake out on a cooling rack, and invert. With a long toothpick or skewer, poke the top of the cake making small holes. Slowly spoon on the glaze. Wait for the glaze to sink in, then add more. Repeat process until all of the glaze is used. (I didn’t poke my cake. I simply brushed glaze on top and sides until no more glaze remained. This worked out well.) Cool cake completely, and enjoy!

Pin It
July 2nd, 2009

The First of the Season

Last weekend brought my very first clafoutis. Cherry and blueberry, eggy and deee-licious! A well-trod recipe requiring just a handful of ingredients, and a pile of fruit, clafoutis is easier to make than a pie (my other summertime favorite), yet equally as delectable. I even included a copy of my recipe in the book. Have a lovely long weekend folks!

Pin It
June 29th, 2009

When it Ever Stops Raining

…For more than a day, maybe that is when my tomatoes will turn from lime green to a sumptuous red. With the new apartment came a little plot of land, not quite a garden, but this is our attempt. Brian and I planted tomatoes, five plants to be exact. They range in variety from Cherokee Purple, to tiny Grape, and the aptly named, Early Girl, which were the first to fruit.

This fruit came weeks ago, and at first I was patient. (No easy task if you are me.) The blossoms withered and died, and little fetal tomatoes grew in their place, and they continued to grow. At first I was happy for all of rain, it meant little watering had to be done. But then it rained, and it rained some more, and if you weren’t wet enough– here, have some rain. The soil became saturated, and my darling Early Girls remained staunchly green.

We had our first dry weekend here in Connecticut in weeks. I’m hoping that it did my tomato plants some good. I begged them each day to soak up the rays all that they could– drink in the sun! I’m ready, getting more ready every day to eat you, I told my plants. When I planted these tomatoes I imagined having a bumper crop, tomatoes coming out my ears, but now we’ll see. If you would like, think sunny thoughts about these beauties. And to anyone who is an avid gardener out there, I have one plant that has yellowing leaves, what does this mean, and how do I get rid of it? Suggestions are always welcome!

Pin It
June 19th, 2009

Flowers to Eat

Our farmers’ market is finally getting going. The stinky man selling soap (the irony is almost too much!) is having to share booth space with vendors actually selling produce. The woman selling wool yarn has packed up her wares until the fall, but alas, the man selling treacly maple syrup will always be there. Last Saturday there were strawberries, in those adorable, frosty blue quart containers, the nubby cardboard working hard to contain the luscious berries.

Here in Connecticut there has been a lot of rain lately. A lot– you would think we were in Oregon. But last weekend there seemed to be a break in the weather. The sun peered through the clouds on Saturday morning, and it seemed as though everyone had the same idea. Brian and I used to live just down the street from the farmer’s market. We would roll out of bed, and head down to Wooster Square. But our new place is no longer a stone’s throw away, so we piled in the car, and headed to the Square.

I wasn’t expecting much, but the market was teeming with people, and there were even more vendors than the week before. Even my ladies were back! By “my ladies,” I mean a group of young women, some of whom look about high school age, who work at a farmstand with excellent and reasonably priced produce. They were set up at the end of the market, scales swinging, weighing bunches of collard greens and Japanese turnips. I always make a bee-line to them first. But as I was making my way to the end of the market, I stopped to look at these tall, spindly stalks with yellow blooms.

I was told they were rabe blossoms, from broccoli rabe plants. “And what do you do with them?” I asked. The ruddy faced balding man tore a clump of flowers from the stalk. “You eat them,” he said, offering me a blossom. I chewed. Flowers are always such fun to eat. I feel as though I’ve snuck into the garden, and I’m doing something that I shouldn’t. The flavor of these blossoms was subtle yet herbaceous, like a delicate broccoli rabe. “I just bring them home, eat some, and leave the flowers in a vase on the table– they’re sort of pretty too,” the vendor told me.

And that is exactly what I did. That weekend I made a chicken-bread salad and topped it with these lovelies. Then there was the scape and bok choy stir fry I made which had a springy floral garnish. The next day I made sandwiches with long-cooked broccoli sprinkled with the blossoms. It rained even more this week. But each day, as the stalks became more barren, the vase on the kitchen table gradually getting picked over, the arrangement on the table reminded me of the imminence of summertime. And it all became a little bit more bearable.

Pin It
June 14th, 2009

Calling all Nutmeggers!

Hi Everyone,

To all my readers in the Nutmeg State, I will be appearing at RJ Julia Booksellers in Madison, CT, Monday evening June 15, with fellow memoirist, Giullia Melucci. Later that same week, on Saturday June 20, at 2 pm, I will also be at the Yale Barnes and Noble. Both events are free to the public, and I will be reading, and signing my book. Come on down, I would love to meet you!

In other news… Do you compost? Well, I didn’t. That is until my friend, and fellow writer, Jude Stewart wrote a detailed article, rating composters, and needed copious amounts of food scraps. She turned to me, and I quickly realized I make a lot of reusable trash. You can read her article here, and if you are in the market for a state-of-the-art composter, she just may have a suggestion or two for you. Long live trash to nutrient-rich soil!

Pin It
June 3rd, 2009

More of The Same

So I think this is going to be a quick one today. Why? You might be asking. Well, Brian and I are moving again, just across town, but still, we are on the move again. I’m sure I don’t have to tell you, moving is a royal pain. It’s like a blister that just popped on your heel when you still have a mile to walk. (That’s how much I like it!) This year I can blame all of the difficulties on James Beard and Craig Claiborne. Let me make that statement a bit more explicit, I blame it on their books.

In Niantic, Connecticut there is a funky, used book store, in a ramshackle house and several out-houses, called The Book Barn. It may not be the best book store ever, but it is one of the most charming. I find that the trip holds all of the eager anticipation of a good scavenger hunt– I’m not sure what I’ll find, but surely it will be a treasure. Each time I’ve gone to The Book Barn I’ve come home with cookbooks by those two departed masters, Beard and Claiborne. And since I have lived in Connecticut, my cookbook collection, which already had considerable heft, has grown exponentially. Beard on Bread, and Beard on Pasta too? Got it. They’re sitting next to collections of year ’73 and ’74 of Claiborne’s writings and recipes. As I pack up box upon box of heavy books, I curse (though secretly adore), my ever-growing collection of cookbooks.

Okay… That was a rather lengthy diversion, and now for the main event– Leek and Egg Pizza.

Pizza crust embellished with sautéed leek, Parmesan cheese, and a scrumptious cracked egg, sound familiar? That’s because it is, but it goes to show, what’s good once, is often good twice. You can make this pizza with the dough of your choosing. Simply sauté some cleaned, sliced leeks in olive oil, seasoned with a bit of red pepper flake, salt and pepper, until softened. Douse the stretched pizza crust in olive oil, and then spread the leeks on top. Sprinkle with some freshly grated Parmesan, and bake as directed. (Mine baked in a very hot, 475 degree oven.) When the pizza is just about ready, remove from the oven and crack one or two eggs on top. Then put the pizza back in the oven for another 2-3 minutes, just until the white is set.

With some more freshly cracked black pepper, you have a lovely flat-bread-like pizza in minutes. Gooshy, with the hardly-set yolk, and mellow with the slippery white, this pizza has that oniony bite without being overpowering. Yum.

Now I really must go, this wasn’t such a quick post after all! Next time, from my new home…

Pin It
May 27th, 2009

The Muddler

Muddle is just one of those perfect words. It’s almost onomatopoeic– like smooch, or mushy. In fact, I think that I abuse this little double syllable. Phrases like “muddle through it” seem to so aptly describe my life at times, when I’m just at a loss, when every little thing seems completely insurmountable. Yes, it is times like those that I just seem to muddle through, and then I muddle right home, and make myself a cocktail– a wine cocktail.

Now, I’m not much of a boozer. I guess you would call me a lightweight. One martini and I’m a bit woozy. But give me a wine cocktail, a warm evening with the sun casting a pink light on the horizon, and I am a happy girl! I know, I know, a wine cocktail? You might be saying, “Who am I reading here, Bartles or Jaymes?” But let me assure the skeptics– slightly fizzy, fruity, off-dry– there is one word for a good wine cocktail and that is refreshing. And in this latest concoction, you even get to do a bit of muddling.

With my relative novice stature as a booze hound, it took me awhile to discover Lillet. For those of you who are not familiar with this apertif, Lillet is a fortified wine. This means it is fermented with a small amount of distilled alcohol, so it never goes off, and has a slightly higher percentage of alcohol. The flavor is citrus, and floral, and altogether delicious. It comes in both white and red variety, but I’ve stuck with the white. Hey, if you find something you like, why mess with a good thing? Lillet is best served chilled, and can be drunk on its own, or with a splash of seltzer for that effervescence. Or you can muddle it.

Here’s what I did: In a glass, take a handful of crushed ice, a few fresh, torn mint leaves, and some frozen berries (I used Trader Joe’s black raspberries). Then go to town; muddle that mixture like you’ve never muddled before!* Spoon the ice mixture into cocktail glasses. Pour yourself a few inches of Lillet, and then top off with seltzer. I know this recipe is far from exact, but that’s the beauty of the laissez-faire wine cocktail. Like it particularly minty? Add more fresh mint. More fruity? Add berries a plenty. Just be sure that when summer hits, you’re ready with a wine cocktail.

*I don’t actually have a proper muddler. I used the end of a clean wooden spoon and a sturdy drinking glass, and it worked like a charm.

Pin It
May 14th, 2009

Popovers!

All popovers are not created equal. Awhile back I made a recipe for oatmeal popovers by Marion Cunningham, whom I normally adore. With finely ground oatmeal, and a dollop of orange marmalade baked in the bottom, they sounded superb. Well, turns out they weren’t. They never really puffed (or popped as it may be), and I had a muffin pan of full of deflated batter with marmalade that was too bitter for my taste. Oh well, every cookbook writer is allowed a dud every now and again.

When I was at the market last week, the strawberries finally looked good– rosy, with a sprightly green stem– not a crinkly brown one. I bought a basket, and ate almost all of them plain. But with the final few, I decided to make a more classic popover to redeem the oatmeal debacle of late. And these strawberry popovers definitely did the trick. To say that these popovers were redemptive is putting it mildly.

There is something just so exciting about taking popovers out of the oven. In goes an ordinary milky batter, and a half hour later, out comes glory. These popovers had everything I love about the classic– a subtle eggy-ness, a beautiful brown crust, and an almost custard-like texture. The only twist to this morning treat were the chopped, fresh strawberries contained within. The berries got even sweeter upon baking; they juiced, tinging the popover with a berry-scented goodness. With the strawberries baked right in, these lovelies didn’t even need butter to spread, or honey to drizzle, just a hot cup of coffee, and a bright morning.

Strawberry Popovers
adapted from Mark Bittman and Michael Ruhlman

makes 9-12 popovers depending on muffin pan

2 eggs
1 cup milk
1 teaspoon sugar
pinch of salt
1 cup flour
3 tablespoons butter, melted
1/2 cup chopped strawberries

Place a muffin pan in the oven, and preheat to 450 degrees.

Beat together flour, eggs, milk, sugar and salt. Let the mixture rest while oven comes up to temperature. When oven reaches heat, remove pan and working quickly, drop some strawberries and a few teaspoons of butter into each cup. You want enough butter to cover the bottom of each cup. Fill the muffin tins, at least halfway, with batter.

Drop the heat to 375 degrees, and bake for 20-30 minutes. Remove from pan with an off-set spatula.

Pin It
May 6th, 2009

Something Out of Nothing

Sometimes, at the close of a weekend full of errands, dinner with friends, and general busy-ness, the most you can do is tumble onto the couch with the book review section of the New York Times. And then you remember that, oh yes, you have to feed yourself. What to do, what to do?

Growing up, my mother called Sunday suppers, “Fend for Yourself Night.” I must have gotten this propensity for laziness from someone. Usually my mom would do some cobbling together: there would be leftovers, or a can of tomato soup with some elbow macaroni bobbing about in the broth, there were eggs to cook, and if things really got slim, a bowl of cereal usually did the trick. But the one thing that these dishes had in common– mom didn’t have to spend much time in the kitchen.

Last Sunday I found myself throwing together a bit of this, and little of that, making my own, “Fend for Yourself Night.” It was already dinner time when I found myself standing in front of the pantry deciding what to make. Hunger is always a good impetus for making a meal. There wasn’t much, some pasta (always a standby), a few cloves of garlic, and from the refrigerator, some springy leeks. So I set to work, chopping and slicing, while the water percolated on the stove for the pasta.

I have made Farfalle with Scrambled Eggs for myself many times before, so I thought I would share it with you for those evenings when you are at a loss as to what to prepare. This dish is so simple, so delicious, I hope that it becomes one of your standards as well. Made in the time it takes to boil your pasta, you simply sauté your leeks and garlic, then gently scramble some eggs until they are hardly cooked with tiny curds looking like bumps in a gravel road. In goes the farfalle, a little cheese, maybe a bit of cooking water to make the dish more fluid, and dinner is served. It’s not much in terms of ingredients, but the flavor is rich and creamy (although no cream is used) and the leeks simply melt away leaving behind the suggestion of onions.

The next Sunday night that you find yourself standing in front of an opened refrigerator trying to decide what to make, give this dish a try. Sometimes the best meals are made with next to nothing.

Farfalle with Scrambled Eggs
serves 2, with leftovers

2 leeks, white and light green parts only, sliced thin
3 cloves of garlic, sliced thin
2 tablespoons butter
1 tablespoon olive oil
4 eggs
1/2 pound farfalle pasta
1/3 cup grated Parmesan cheese, plus more for garnish
a bit of reserved pasta cooking water if necessary
salt and plenty of pepper

Begin to boil pasta in a large, salted pot of water.

In a large skillet, over medium heat, melt butter and olive oil. Add the leeks and garlic, seasoning with salt and pepper, and sauté until softened and falling apart. About 5 minutes. In a bowl, whisk the eggs until blended. Bring the heat down to low, and pour in the eggs. Keeping the eggs constantly moving, slowly scramble until partially cooked. The eggs should be set, in very small curds. Season again with salt, and lots of pepper. Remove the skillet from the heat.

Add in the cooked pasta, and the Parmesan cheese. Toss well, add in additional pasta cooking water, if pan seems dry. Taste, adjust seasoning, and serve with more Parmesan cheese, if desired.

Pin It

I think that rhubarb is really one of those vegetables that is best served as a fruit– like a tomato in reverse. That is not to say that I have never been swayed to try out rhubarb as a savory component to my meals. If I remember correctly, several years ago, I tried out a pork tenderloin dish with roasted rhubarb and sage. It was bad. Needless to say, as I was ingesting the relaxed, roasted rhubarb, all I was thinking was that I wished I had stewed the rhubarb in sugar, and forgotten about the pork entirely. But you have to give things a shot to determine their worth.

Rhubarb is an odd vegetable/fruit. It can range in color from a gentle celadon to a shocking pink, all in the same stalk, making it look like celery’s racier cousin. I am always tempted to eat it raw, it looks so springy and sweet. But looks can be deceiving. When raw, the taste is puckery, and tart to the extreme, but when stewed or baked with sugar this vegetable finds its natural affinity, like a babe to milk.

But what is most exciting to me, is that rhubarb signals the on-coming spring. It really is the first bit of produce that says, “Just you wait, there is more to come!” So when I saw these gorgeous stalks at the market, seemingly tossed like an afterthought in a pile next to the strawberries (the most common of pairings), I scooped up a pound or so. The rhubarb was beautiful, but the strawberries– not so much. I thought, with only the smallest hint of sorrow, a solitary rhubarb dessert would have to be on the menu that night.

I should not have been so hasty in my disappointment, a rhubarb cobbler is wonderful! I kept it simple, slicing the stalks, into 1/4-1/2 inch pieces, and tossed them in sugar. A squeeze of lemon juice, a modicum of vanilla, some cornstarch for thickening, and then I got to work on the topping. This recipe is for a cobbler, not a crumble, so I made a biscuit-like dough, with a bit of cornmeal for added texture and chew. This is my go-to cobbler recipe, and so I was pleased to find it work out so well with rhubarb too. Because of the tannic aspect of raw rhubarb, the cobbler was just sweet enough, and with a drizzle of vanilla yogurt, this makes the perfect close to a springtime meal.

Rhubarb Cobbler
made in 9-inch pie plate

For the filling:

4 cups slice rhubarb (1/4-1/2 inch thick)
squeeze of half a lemon
1 teaspoon vanilla extract
1 tablespoon cornstarch
1/2 cup sugar

For the topping:

3/4 cup all-purpose flour
1/4 cup medium to fine ground corn meal
4 tablespoons sugar
1 teaspoon baking powder
1/2 teaspoon baking soda
1/4 teaspoon salt
3 tablespoons unsalted butter, cold and cut in 1/2 inch cubes
2/3 cup buttermilk

For the filling: slice the fruit, and put into a medium-size bowl. Add the lemon juice and the vanilla, and toss. Add the sugar and the cornstarch, and toss well to evenly coat. Set mixture aside while preparing topping.

For the topping: Preheat oven to 350 degrees. In a large bowl, whisk together all of the dry ingredients. With your hands, mix in the butter. Rub between your fingers until mixture resembles a coarse meal. Add buttermilk all at once, stirring together until dough is just formed.

Put filling into a pie plate. Spoon topping evenly over surface. It is fine if the topping does not cover entirely, it will spread during baking. Bake until fruit is bubbling, and topping is golden brown, approximately 40-45 minutes. Let cool slightly before serving. This cobbler recipe is great with other summer fruit as well. It requires little substitution, except for the amount of sugar in the filling can be decreased when using sweeter fruits like peaches or nectarines.

Pin It
© 2024 wordpress test site
all rights reserved