April 23rd, 2009

Dessert for Many

When it comes to meals with my husband, most of the time I am quite alright with a table for two. When we go out, it usually means that there is sure to be leftovers brought home and enjoyed at lunchtime the following day. Or when I cook at home, it means that Brian and I can share a large strip steak for dinner, seared in my cast-iron skillet, and cut on the bias. Yes, most of the time, I am able to be convinced of delicious intimacy in dining for two. But then I think of dessert, and the joyful clatter of dishes turns to angry silence.

For those of you that have been Nosheteria readers for some time, you are very familiar with my love of the final course. I have a very mean sweet tooth; it bites when not fed regularly. The problem lies in the fact that so many desserts are truly meant to be enjoyed in groups. Don’t get me wrong, I was raised well by my parents, who taught me the age old rule of share and share alike. When I make a pie, you can bet that I also have friends over to share the wealth. And countless times I have sent Brian off to work with foil-wrapped leftovers of unfrosted cakes or piles of cookies. This usually makes him quite popular.

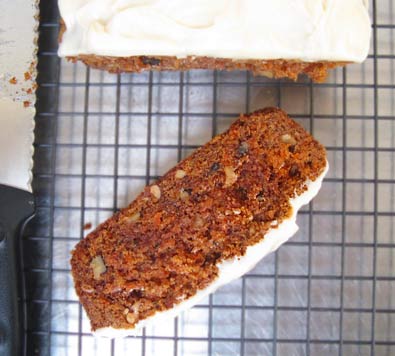
But there are the times when I have a hankering to do a bit of baking, and I know that I will be a lone eater of the final product. Case in point: carrot cake. I love the stuff– the moist crumb, the subtle crunch of a walnut here and there, and that whipped goodness of cream cheese icing. I am a goner. Brian, however, could take it or leave it. Can I really justify making the dessert if I will not have even one cohort in eating it. What to do, what to do? Well, I will tell you what I did– I got an invitation to a cook-out.

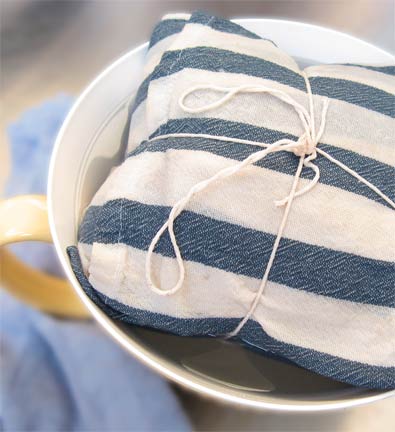
Last weekend was glorious. I know that I have been doing a bit of complaining about the weather not being up to its sunny par, but last weekend it was stupendous. It seemed that overnight the cherry blossoms had riotously bloomed, and the lawns were a verdant green. I caught the first glimpses of spring. So when an email was sent out inviting Brian and I to bring meat and gather round the BBQ to enjoy the highly lauded springtime weather, I quickly went to the store, bought a passel of sausages, and a few carrots, and got to work.

I decided on making carrot bread, rather than an all-out, layer cake. And found this recipe, claiming to be a lighter alternative to the standard carrot cake. I don’t know that it was lighter, but it was sturdier, and just as delicious. With a crisp crust, yet tender body, making the carrots literally melt away, this bread was a hit. I added a bit of homemade cream cheese icing, because what is a carrot dessert without its counterpart? Full of sausage, hamburgers, grilled veggies, and salads of all sorts, my friends managed to save room for dessert. I even got a piece, yet managed to take home an empty container at the end of the evening. I would say that’s a successful dessert.

Cream Cheese Frosting

enough for one loaf of carrot bread

4 ounces cream cheese, softened to room temperature
2 ounces unsalted butter, softened to room temperature
1 teaspoon vanilla extract
1 cup powdered sugar, sifted (more to taste, if you like it sweeter)
pinch of salt

In a medium-size bowl, cream butter and cream cheese until well incorporated, and whipped smooth. Add vanilla. Sift in the powder sugar, and the pinch of salt, and continue to beat until smooth. Frost the top of the loaf. Carrot loaf should be completely cool before icing.

Pin It
April 15th, 2009

Kale in April

I try to eat seasonally, and locally is even better. But I must admit, it is about this time each year, as I plunge my hand into the produce bin at the market, only to retrieve yet another clump of chard, or spinach, or dandelion greens– I curse my fate. I try to keep my cooking somewhat innovative, so I thought I had tried eating my greens most every way I could. There was steaming, braising, simmering in soup, or sauteing with a splash of vinegar. Each method was like watching a favorite movie on cable– aggravating with all of the commercials. I needed something more.

We may be more than two weeks into spring, but here in Connecticut, it is still staunchly winter. I wore a wool scarf on Easter Sunday. It was darling, teal green, and knitted by my mother, but nonetheless, it was wool. The ground however is thawing; crocuses are pushing their way through the hardened soil, and tiny buds are resting on tree branches. But as far as the produce goes, it is still January. That means yet another day of tangy oranges rather than fuzzy apricots, and a few more weeks of dark, leafy greens.

Well, I discovered a new method of getting my quotient of leafy greens. You know kale– that curly stuff more often used as a garnish at Denny’s than actually eaten as a side dish. I actually feel sorry for it. A little while ago I flipped on the television and found Jacques Pepin making baked kale and serving it much like you would potato chips. It was so simple– here’s what he did. Clean a bunch of kale, then pluck the leaves from the stem, tearing into bite-size pieces. Then toss the kale in olive oil to coat, salt, and pepper, and I added a clove or two of minced garlic. Spread the kale out in a single layer on a cooling rack-lined baking sheet. The reason for the rack, is that you want the kale to bake evenly on all sides. Place in a low, 275 degree oven, for 25-30 minutes, tossing once during the baking process– and there you have your vegetable side dish.

It may not look like much, just a pile of withered leaves, but it tastes wonderful. Different from sauteing or braising, where the kale practically cooks down to nothing, baking at this temperature is like dehydrating. The vegetable becomes chewy yet slightly crisp around the edges, and more concentrated in flavor. I, unlike Jacques, didn’t serve these as a vegetable chip, but rather I ate my kale with a piece of fish, and some roasted new potatoes. And I must say, I was quite pleased with my same, old kale.

Pin It
April 6th, 2009

Pink Stuff

Do you know Sarah McColl? She is the author of the exquisite blog Pink of Perfection. Her blog has a little bit of everything: food, crafting, shopping, and living, all written in Sarah’s breezy style. Well, she was nice and enough to do a profile about me. I answered a few of her thought-provoking questions, about the book, writing, and cooking. Click on over, to read a little more. Thanks Sarah!

In other news, a few weeks back I did an interview (also book-related), with Evan Kleinman, the host of LA’s Good Food, on KCRW, their NPR affiliate. The segment aired over the weekend. Give a listen, to hear a bit more!

Pin It
April 2nd, 2009

Comfort Me With Soup

Let’s pretend it’s still March shall we, because that is when I prepared this comforting bit of soup. March can be a month of maybes, a time of indecision. Is it spring or is it still winter? The thermometer may reach into the 50′s during the days, beckoning you outdoors, only to fall once again below freezing at night, forcing you to pull on you woolen socks to complete your wintertime, pajama ensemble. It all can be a too much to confront.

When I am tired, maybe a tad lazy, and find myself in the kitchen with nary an idea of what to prepare, this soup is ideal. Cream of Tomato Soup is rich, calming, and satisfying, and can be made with what most of us have in the larder on a good day. It is the apotheosis of comfort food. Macaroni and cheese, scrambled eggs, butterscotch pudding– come to think of it, most any dairy-laden foods mark the cornerstones of many American comforts. And not far down the list for most people is a gooey grilled cheese sandwich dunked in a bowl of tomato soup.

This combination was surely a popular lunch choice from my past. The soup may not have been homemade at the time, but it was still as comforting as a warm embrace. When I was young, and spending the day at my grandma’s house, she often would make this meal for me. Grandma often loosened the concentrated soup with a cup of milk, not the suggested cup of water. Even coming out of a can, yet thickened with milk, the soup seemed somehow decadent. And the deep pink hue was a delight for the girl who, like so many of peers, loved that Peptobismal shade.

This recipe maintains that hue, though now it is more adult, and slightly salmon-colored in nature. It is important to add the 1/2 teaspoon of baking soda, to ensure a sturdier base of milk when the tomatoes are added, or else the result will be a curdled mess. Creamy, yet light, and mild in flavor, this soup makes a perfect compliment to, you guessed it– a grilled cheese sandwich.

Cream of Tomato Soup

3 tablespoons butter
1 small onion, chopped
3 tablespoons flour
3 cups milk
1/2 bay leaf
1 1/2 teaspoons sugar
1 1/2 teaspoons salt
1/2 teaspoon baking soda
1 large (28 oz.) can tomatoes, with juice

In a dutch oven, melt butter. Add the onion and cook over medium heat until softened. Sprinkle flour over butter and onion, continue to stir, cooking for 1 to 2 minutes. Slowly add the milk, bay leaf, sugar, and salt. Continue to cook until mixture thicken slightly. Stir in the baking soda.

Crush the tomatoes with your hands, and add them to the soup along with the juice. Bring soup just to a simmer, careful to not scorch the milk-based soup. Remove from heat, and process until smooth, with a hand blender, or regular blender. Andy froth that is created will subside. Reheat soup to simmer, and serve.

Pin It
March 16th, 2009

Polly Wants These Crackers

I was a latch-key kid. But please, don’t feel sorry for me– I loved the time alone. There was something so settling about a quiet house to come to, with no one pestering me about schoolwork that had yet to be completed. The school bus would drop me off just houses away from where I lived, and I would trudge home, appropriately exhausted. After dumping all of my books, and stacks of handouts, in a basket near the front door, I would make a bee-line for the pantry.

If the pantry were the refrigerator, surely my mother would have reprimanded me for standing in front, letting all of the cold air out. I gazed at the various packages of food for what seemed like hours. Sometimes I would have some cereal, a replay of my morning meal. At times a can of soup would tempt me. But if I spied a red box, emblazoned with the kind of mispellings that only snack foods, motels and diners can get away with, you could almost bet that a handful of Cheez-Its would become my treat du jour.

Who doesn’t love a Cheez-It? They’re salty, crispy, and well, cheese-y, and they were the snack cracker of my youth. I would plunge my little hand into that box, retrieving a handful of unnaturally orange squares just calling out to be eaten. The technicolor crumbs would settle on my fingers as I repeated this action until I had consumed enough to satiate my hunger, yet not enough to spoil my appetite for dinner.

When I saw this recipe for Parmesan Cream Crackers a few weeks back in the New York Times, and read of Mark Bittman’s childhood affection for Cheez-Its, I knew that this would be just the perfect late afternoon snack. I followed the recipe closely, and while rolling out the dough, thought to myself, “Crackers seem like such a snap, why hadn’t I made them before?” I baked them up, and Bittman’s cheese crackers were simply– meh. There was no crackle, no flakiness, no crisp texture, nothing of what I’m longing for in a snack. But they did taste cheesy, and salty– two definite pluses. The recipe just needed to be toyed with. So back to the kitchen I went.

What I came up with is in essence the same list of ingredients, just a different handling of the dough. The original recipe was similar to your basic pie crust, but in order to make a crisp, flat, cracker-like texture, the dough needed to be docked several times before baking. I rolled out the dough quite thin (1/8 inch thickness), and before scoring to make square cracker shapes, I took a fork, and poked the surface of the dough several (40-50) times. By docking, air is released from the dough in the baking process, making a thinner, flatter cracker.

The finished product was divine– crispy yet chewy, with just the right amount of salt, and a distinctly homemade character. I almost didn’t miss my Cheez-Its at all.

Homemade Cheese Crackers
loosely adapted from Mark Bittman

1 cup all purpose flour
1/2 teaspoon salt
1/2 cup grated cheese (I used sharp cheddar, but I imagine any strong flavored, hard cheese such as, gruyere would be excellent)
4 tablespoons unsalted butter
1/4 cup half-and-half, or light cream, more if needed
Coarsely ground black pepper

Put flour, salt, cheese, and butter into the bowl of a food processor, and pulse to combine. Add the cream, and let machine run until the mixture comes together yet is not sticky.

Roll out the dough on a lightly floured surface until 1/8 inch thick, using additional flour if necessary. Transfer dough to a parchment or Silpat lined baking sheet. With a fork, poke dough randomly, several (40-50) times. Score the dough to obtain 1-inch square cracker shapes. Sprinkle with pepper.

Bake at 400 degrees, for 17-20 minutes, or until lightly browned. Remove from oven, cool, and break into cracker shapes.

Pin It
March 5th, 2009

Marshmallow and Me

I realize that I remain rather anonymous to all of my blog readers– well, no more! Yesterday I did a segment on Connecticut Style, a local show that airs from WTNH, the local ABC affiliate, right here in New Haven. Now you all know that Connecticut is highly regarded for its style…Christmas sweater anyone? I’m kidding!

Connecticut Style is a nice, weekday program, hosted by Sonia Baghdady and Desiree Fontaine, featuring local guests from all walks of life, with a cooking segment virtually every day. They were nice enough to let me come on the program, talk about my book, and cook a piece of fish. But I wasn’t the only guest…my segment followed an interview with Marshmallow the therapy dog, a fluffy Bichon Frisé (with a headshot, to boot) and his owner, Paul Rothberg.

Here’s my clip:

If you want to see Marshmallow, you have to visit Connecticut Style!

Pin It

As you probably can guess, from being a food blog writer, I also read a lot of food blogs. And if there is one common thread that is sewn amongst my fellow bloggers each February and early March it is that spring cannot come soon enough. So I feel that it is safe to speak for a few and say: we are tired of soup, and braised dishes are lovely and rib-sticking, but—bring on the grill and we are all dying for a peach!

But speaking from 30 years of experience, let me say, as the wind whistles round us, we have some time to wait before Spring’s arrival. So why not enjoy it? Dust off that soup pot for just a while longer, braise yet another interesting cut of meat, and discover the wonders of citrus fruit. To me, nothing invokes warm weather fare like a salad. (I know, I know, it must be the Californian in me.) But it can be hard to keep a salad interesting in the middle of the coldest, most blah time of the year. How interesting is a head of green leaf lettuce anyway? Then I saw a recipe from the Minimalist, Mark Bittman, for an orange and olive salad in last week’s New York Times, and it looked divine.

First, you make a coarse paste from pitted, oil-cured olives, and olive oil, pulsing moderately in a food processor. The paste comes together with ease, and if you squint your eyes just so, it even looks like Beluga caviar. Fancy! Peel the oranges with a sharp knife, then slice them cross-wise into geometric disks. Spoon the paste onto the orange slices, and sprinkle some herbaceous fresh thyme. A drizzle of a good, green olive oil, and lunch is served.

There were three types of oranges that I used: traditional Navel, mild Cara Cara, and vibrant Moro Blood oranges. Although having the variation in color was a treat for the eyes, I felt that Cara Cara orange, known for its mild flavor and low acidity level, got lost when combined with the potency of the olive paste. But other than this minor change for next time–and there will be a next time–this salad was utterly delicious. The pungency of the olives toyed with the gentle acidity of the orange, bringing a pleasant melange to the tongue. Having a lunch that is assembled rather than cooked, and wonderfully simple in its construction made me feel like I was having a little bit of summer, right here, in the dead of winter.

Pin It
February 18th, 2009

Bloated to Perfection

When I started this blog way back in January of 2005, I wasn’t much of a baker, so this wasn’t much of a baking blog. I wrote about chickpeas, zucchini, quickly frying fish, or sautéing vegetables. Standing, perched over my cast-iron skillet, or waiting impatiently while a roast chicken fragranced the entire house with its subtle aromas of lemon and thyme was all par for the course.

But as time went on, for the sake of everyone’s interest, both the diligent reader and the refreshed writer, I expanded my horizon. Occasionally a cookie, a cupcake, or even a pie or two crept its sugary way onto the Internet in the form of a Nosheteria post. I found that baked goods were nothing to be feared, but rather, they were to be relished. Yes, the long-time dessert lover, was becoming a baker as well.

This summer, when Brian and I moved to New Haven, my baking curiosities were solidified when I approached the final frontier—bread. And let me tell you, once you’ve tasted scratch, you never go back. Or at least I couldn’t. I, by no means, am a professional baker, but to say that I have an affinity for home-baked bread is to put it mildly. My freezer is now full of an assortment of loaves and nubby rolls. I have a two pound container of active dry yeast chilling and waiting to be used in the refrigerator. Flours are my friends. And, of course, there is now the constant pursuit of the ideal bread baking book. I have found more than a few which I love, among those, Beard on Bread, which I have written about before. But this recipe deserved a revisiting of that book.

Water-Proofed Bread, is exactly what it sounds like—a satiny smooth dough, laden with butter and eggs, which has its first rise while nestled in a tea towel, submerged in water. Bizarre, right? After I read the account by Beard, I ran to my cookbook shelf, and scanned each of my bread baking books for a similar recipe. Nothing. Several Google searches and I came up with a big fat zero. I have discussed this bread recipe with other home-bakers, and they have never even heard of such a thing.

Well, all I can say is, the silence is doing a big disservice to bread lovers everywhere. I will shout it (or write it, as it may be) from behind my computer screen, this bread is stupendous! The dough is soft, almost shaggy, and when mixing it up, you may even say—this doesn’t look like much. But upon kneading, it comes together like a pillowy dream. During the proofing process, the dough bloats, and eventually rises to the top of a water-filled bowl, becoming silky and light as a feather. I have made this bread several times, this last time forming individual rolls out of the dough and adorning them with crunchy poppy seeds.

The bread itself is similar in nature to a brioche or a challah, eggy and rich, with just the right amount of sugar to lend a beautiful caramel color to the crust. Perhaps this method is some forgotten relic of the past, but I say it’s time to revive it. If anyone has been baking water-proofed bread for years, please drop me a line. I would love to know where you got the recipe.

Water-Proofed Bread
from Beard on Bread

2 packages (approximately 4 1/2 teaspoons) active dry yeast
1/2 cup warm water (100-115 degrees)
1/4 cup plus 1 teaspoon granulated sugar
1/2 cup warm milk
1 stick (1/2 cup) butter
2 teaspoons salt
3 eggs
3 1/2 cups flour

makes 2 loaves, or about 18 rolls

Rinse a large mixing bowl, or the bowl to an electric mixer with warm water, and dry thoroughly. Put yeast, warm water, and the teaspoon of sugar in the bowl. Stir to dissolve the yeast, and allow to proof for 5 minutes.

Heat the milk with the butter and 1/4 cup sugar, just until the butter is melted. Add this mixture to the yeast mixture, stir in the salt. Add the eggs, one at a time, blending thoroughly after each addition. Stir in the flour, one cup at a time to make what will probably a very wet and sticky dough. Blend quite vigorously. Switch to a dough hook if using, or dump dough out onto a kneading surface. Sprinkle with additional half cup of flour. Continue kneading to make the dough firmer until all of the flour is mixed in to the dough.

When dough becomes more easy to handle (about 3-5 minutes), form it into a loose ball. Place the dough onto a clean tea, or kitchen towel that has been sprinkled with flour. Wrap and tie the towel loosely, just as you would a package. Submerge the package in a large bowl of warm water (about 100-115 degrees). The dough will sink. Let it sit for 35-40 minutes, or until the dough inflates and begins to float.

Lift the dough from the water, letting excess water drip off. Unwrap, and turn out onto a lightly floured surface. The dough will be quite sticky, knead. If making loaves, divide, and place in two well buttered 9-inch bread pans. Cover, and let dough rise in a warm, draft free environment until almost doubled in bulk. If making rolls, cut off, and shape into balls, placing on Silpat, or parchment lined baking sheets. Brush with an egg wash, sprinkling with poppy seeds if using.

Preheat oven to 375 degrees and bake on the middle rack of the oven for 30-35 minutes. Loaves are done when a hollow sound is achieved when rapping with your knuckles. Cool on racks.

Pin It
February 10th, 2009

It's Here!

February 10th will forever be a birthday of sorts. The birthday of my book. What does one do in celebration? Surely it will be different than birthday parties of yore, with the meal of my choosing, a round of duck-duck-goose, and an angel food birthday cake heaped with clouds of loosely whipped cream. A birthday party seems a bit premature. But a little birthday cake—a cupcake—was just the right thing with which say, I’m thrilled.

There is a settling immediacy to blogging. One writes, posts, and puts it out there, for all of the world to see. But it is different with a book. With a book you write, send it in, and then you wait. Wait for comments from your editor, who shows it to her team of people. You edit, she edits, you read, and reread, write some more, then send it back in. Write, read, repeat. There is a gentle to and fro, a collaborative working that occurs, and then—a book.

Now, I look at my book and when I thumb through the pages, a mess of feelings erupt inside of me. Of course there is pride. Being a reader for over 25 years, I am now so proud to consider my work sitting on someone’s bookshelf. Cooking and Screaming was a long time coming, with so many loved ones playing integral parts in my life—thus my story. But there is also a lot of trepidation, and a lot of anxiety. I have put my story out there for the world to read, and to judge, and I only hope that they enjoy what they find within the pages.

Woo! That was a bit serious! So, now what?

Oh yes, cupcakes! They’re good! And these little cakes were very good. The recipe comes from The Wooden Spoon Dessert Book, a compendium of old-timey recipes, the type that have been passed down through the generations, donated as part of a community cookbook, or won a state fair. I bought a copy at a used book store recently, and while going through it and dog-earing recipes, this one, for Burnt Sugar Cake with Burnt Sugar Buttercream Icing, was a stand-out.

A three-parter, with the recipe for burnt sugar syrup starting the whole thing off, this recipe is originally for a standard layer cake. Easily made into cupcakes (about 14), the cake was not too sweet, the perfect foil for the rich and sweet buttercream. I modernized the recipe a touch by adding fleur de sel crystals as a garnish, creating that salty-sweet combination that I love. And the crunch can’t be beat.

So make the cupcakes, and read the book, preferably together. I think that they made a pretty good combination.

Burnt Sugar Cake
from The Wooden Spoon Dessert Book

Burnt Sugar Syrup

1 cup sugar
1 cup water

Spread the sugar in an 8- or 10- inch skillet. Cook undisturbed, over medium heat until the sugar begins to liquefy and color. Then begin stirring until desired color is reached, a deep caramel hue. Remove from heat, then carefully stir in the water, watching as sugar may splatter. Return to heat, and continue stirring until any remaining lumps have dissolved and mixture thickens slightly.

Burnt Sugar Cake

2 cups unbleached flour
½ teaspoon salt
2 ½ teaspoons baking powder
8 tablespoons butter, softened
1 cup sugar
2 eggs
1 teaspoon vanilla extract
4 tablespoons burnt sugar syrup
¾ cup milk

Preheat oven to 350°. If making a cake, grease and flour two 9-inch pans, lining the bottom with parchment paper. If making cupcake grease and flour cups or line with paper cups.

In a medium sized bowl, whisk together flour, salt, and baking powder. In a large bowl beat the butter until light and fluffy. Gradually add the sugar, creaming well. Add the eggs, one at a time, beating well after each addition.

Add alternately (three parts dry, two parts milk), the remaining ingredients. Spoon batter into prepared pans and bake for 25-30 minutes, or until cake springs back when lightly touched in the center.

Cool in pans for 10 minutes, then turn out on wire racks. Remove parchment from cake bottoms and cool completely. Frost when cakes are cooled completely.

Burnt Sugar Buttercream Icing

8 tablespoons butter
4 tablespoons burnt sugar syrup
3 ¾ cups powdered sugar
4-6 tablespoons heavy cream
fleur de sel (optional)

In a large bowl, beat the butter and the burnt sugar syrup until smooth. Add alternately blending after each addition (four parts sugar, three parts cream) the remaining ingredients. If necessary, add additional cream to make frosting spreadable.

Sprinkle with fleur de sel, if using.

Pin It
February 2nd, 2009

A Classic

Potatoes. Boiled, baked, sautéed, and fried– it seems that this season I cannot get enough of them. Maybe it’s the cold weather. The crunchy ice paving the sidewalk outside my apartment makes me want to stay in near the fire, a stack of books to my left, and a piping hot tuber to my right. Carbohydrates, how I love ya! The potato may be perfect in all of its grubby glory, but when you are eating them for days on end (as I have been), they may require a bit of gussying up to make them special once again. Enter the twice-baked potato:

My mother comes from a fairly large family that, for years, gathered together at my grandma’s house for every holiday imaginable. There would be piles of food, far too much for even this family with so many hungry mouths to feed. But a starch that always had a place at the ever-growing buffet table was the twice-baked potato. To the young me, this was the ideal carbohydrate. Self-contained, with whipped potatoes within (who didn’t love mashed potatoes?), a crunchy, almost dry exterior, and the burnished skins– it was every marvelous aspect of the potato, all rolled into one.

I stole the recipe with my eyes. Recalling my grandma baking pounds of potatoes, she scooped out the centers, the potato steaming and almost crumbling into a mixing bowl. Then mashed potatoes were made from this interior, and messily stuffed back into the skins. My grandma always put a sprinkling of paprika on top. “For color more than anything,” she would tell me. Then the potatoes would go back into the oven, to earn their name, at 400 degrees for at least 30 minutes. A pat of butter melting over the top, and I was in potato heaven.

When I was first earning my cooking chops, and having dinner parties from time to time, twice-baked potatoes were a stand-by for me as well. They were so simple to make, and everyone seemed to have some memory of consuming them as a child. But above all, they became a frequent visitor at my dinner parties, because they were the type of food you could make, and then forget about while sautéing a vegetable or keeping your eye on the roasting meat.

Now, my cooking seems to run in cycles. It had been years since I had made what once had been a standard. While scrubbing my potatoes one night for dinner, twice-baked potatoes popped into my head like a greatest hit that keeps playing in redundancy. That night Brian and I had those potatoes again, and I loved them as much as I did as a child. Sometimes, classics will just do that to you.

Pin It
© 2024 wordpress test site
all rights reserved