January 25th, 2009

What's New

The drop date for the book is quickly approaching. I can hardly believe it is almost here! I have started a Cooking and Screaming web page to let all of you know what’s new with the book. (As it turns out, that page is pretty barren now, but more is surely to come.)

In the meantime, you will find an excerpt from Chapter 1, with a recipe included. Every chapter begins with a recipe as a way of getting to the meat (pun intended) of the story. I will be updating this page as I have more information to share about the book.

There is also a link to the new Simon and Schuster web page, complete with me (nervously) answering a few match.com-like questions. Don’t you just love the internet? Check it out!

Pin It
January 20th, 2009

Phat Fat?

There are times when you make something so odd you simply have to share. This weekend I had one of those moments. Recently I have become a bit obsessed—with fat. Butter, schmaltz, duck fat, and who can forget the king of all fats—lard. I have become fascinated with the nuances of fat and this book has only encouraged my curiosities.

For years I had heard that there is no better medium for making pie crust than lard. Supposedly, it would make the dough roll out like a smooth, elastic dream, and the crust would be flaky and crumbly. And then cookbook author Jennifer McLagan confirmed the talk in her book, with a recipe for leaf lard pie dough. Fast forward to last weekend, a blustery Saturday morning, when I walked down to the bi-monthly, winter farmer’s market, and stumbled (well, trudged through the snow) upon a pork purveyor. He was having a two-for-one sale on precisely the type of lard needed for pie dough. I bought a pound of the stuff and made my way home.

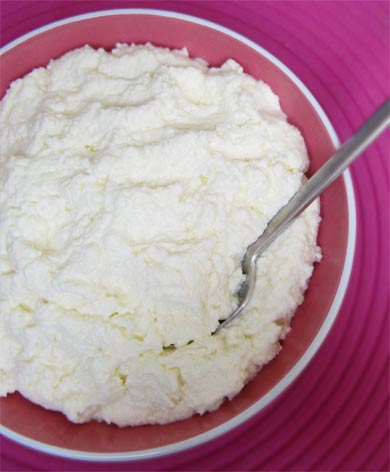
(I tried to make my lard look attractive!)

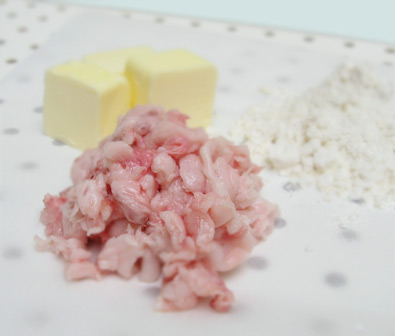
This weekend I had guests for dinner, so I made decided to ease myself into the world of lard with some pie dough, made with a mixture of butter and lard. My lard was whole, needing to be diced into manageable-sized pieces before being combined with the other ingredients to make the dough. When I cut open the vacuum-sealed package a subtle grassy, barn-yardy fragrance permeated the kitchen. But I forged ahead—of course lard would smell barn-yardy, it comes from a barn yard inhabitant!

I made my dough, and it did come together like a dream. The dough was not sticky, it was silky even, and rolled out with ease. But the scent, that outdoorsy fragrance, never disippated. I was making a galette, and as I piled on the ingredients, a smear of almond paste, some sliced pears, and tiny dollops of cranberry compote, I did have a sinking suspicion that I would be making piggy pie. But I cast aside my fears and popped the galette in the oven.

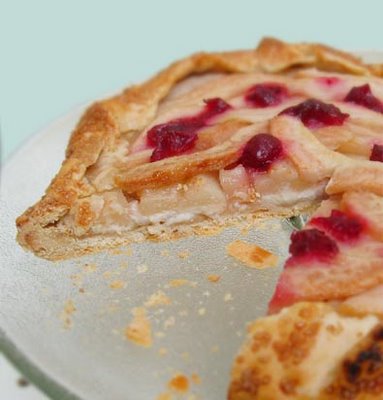
When the galette was done baking, I pulled it from the oven, and it was beautiful—if a bit stinky. I had to try some crust, for no other reason than to protect my guests from having a surprising finish to the meal. I crumbled a small piece of the crust, and tasted. It was truly odd, tasting of peat and pig; the barn-yardy aroma was now a peculiar taste. I called my mother in California, for no other reason than to alert her of my bizarre cooking event. She admonished me (like any good mother would), saying I couldn’t invite people over for dinner without serving a proper dessert. So I quickly ran around and mixed up a lemon pudding (thank you, Nigel Slater), that was light, creamy, and delicious.

When the dessert course rolled around, I served my guests both desserts, with the story of the day’s activities. Surprisingly, they all ate both sweets, though most detected a swine-like flavor in the galette. Upon sampling, I remarked that the galette tasted like Scotch, not one of my favorite alcoholic beverages to begin with. I pushed the pie away, and opted for the delightful pudding instead. But one of the guests loved the meaty flavor of the dough, and while the other guests each politely choked down their one slice of pie drowning it in softly whipped cream, Bobby had three. Which was fine with me; somehow I couldn’t imagine having that galette with a cup of coffee for next morning’s breakfast.

I wonder however, has my modern palate grown too accustomed for lard-based pastry dough, or was I deceived by the pork purveyor, and sold swiney lard rather than leaf lard? I still have one-half portion of lard dough in the freezer, waiting to be used. Maybe I should make another sort of pie with it—a pork pot pie.

Leaf Lard Pastry
from Fat: An Appreciation of a Misunderstood Ingredient

makes enough for a double crust

2 cups flour
3/4 teaspoon baking powder
1/2 teaspoon salt
2 1/2 ounces chilled butter
1/3 cup chilled leaf lard, diced
1/3 cup ice water

Combine the flour, baking powder, and salt in a food processor, pulsing to mix. Add the butter, and pulse just to begin blending. Add the lard and and continue to pulse until mixture resembles small pea-sized pieces. About 15 seconds.

Turn the mixture into a large bowl. Pour water over mixture, and mix well with a fork. Squeeze a bit of the dough between your fingers. If it hold together, transfer to a lightly floured board. If not, add additional teaspoons of water, and test again. Gently knead the dough into a ball. Divide the pastry into two disks. Wrap each in plastic wrap, and refrigerate for at least 30 minutes before using. This pastry also freezes well.

Pin It
January 9th, 2009

Note to Self

No, this is not simply a forgetful phrase uttered to myself one too many times. It is also a name of a new book, edited by Andrea Buchanan of which I was honored to be a part. Speaking with Andrea, she told me a little bit about her project. It was a collection of personal essays by women, for women, discussing a defining moment in their life, the moment that so many of us grapple with, fight against, that makes us stronger, more well-rounded, empathetic individuals. I, of course, was thrilled to even be asked, and got to work. And now, almost one year later, the book is here.

The one thing that I have learned from my experiences, no matter how minute, in the publishing industry, is there is a lot of hurrying-up-then-waiting. There are deadlines, emails passed back and forth, more deadlines, proofs, and proofs, and don’t forget, more proofs. But when the book is in your hot little hands, it all seems somehow worth it. It is easy to forget about the toiling when you have a tangible final product. That is kind of how I feel about this book. Although my own book comes out in about one month’s time, and has absolutely been a labor of love, this book is the very first in which my work has been featured. I couldn’t be more pleased.

I share the bill with many well-known women such as, Sheryl Crow, Camryn Manheim, and Trudie Styler, but there are also unknown inspirational women, such as a seventy year old, HIV positive grandmother, or the thirteen year old girl struggling with, and overcoming her diagnosis of rheumatoid arthritis. And then there is my story, a paen to my life in the kitchen, and negotiating just how to do what I love in a newly transformed body. I am in good company, don’t you think?

Check the book out if you get the chance, it is definitely a New Year’s resolution-worthy read!

Pin It
January 5th, 2009

"A-Mmmazing"

“Yum. These are amazing. Really good. Scrumptious even,” Brian exclaimed over dessert last week. When we met (way too long ago), my husband didn’t have much of a sweet tooth. In fact, I don’t even remember there being a box of cookies, or the lone candy wrapper blowing around like a tumbleweed in his apartment the first time I visited his abode. This was not the case for me. I always had a little sweet treat squirreled away. Who knew when that bar of chocolate I was saving for a rainy day would have come in handy? And it always did whenever I would start jonesing too hard.

But as the years progressed, sugar, and I, with our very own close personal relationship, began to wear him down. Brian still does not lap up pools of chocolate sauce, or partake of enormous slices of cake, with the buttercream whipped into icy peaks, on a regular basis; but a biscuit or a cookie, an ascetic slice of apple galette, or a dish of coffee ice cream is now enjoyed at the end of dinner. (He has not caught up with my consumption of dessert after each meal, save breakfast, but I have a lifetime to work on him.)

With this little bit of background information, you can imagine my surprise about his proclamation in favor of these little desserts that I whipped up with ingredients that I had on hand. The yumming and mmming continued as Brian poured a bit of fresh cream on top of the pudding, letting it sink down into the chocolatey porridge. My husband is always one of my biggest fans in the kitchen, thanking me wholeheartedly for each meal, and doing up all of the dishes diligently– but even I was aghast at his gusto. What had become of my dessert dilettante?

Then I remembered: Brian meet Nigel Slater; Nigel, Brian. It is no secret that I am a die-hard fan of Mr. Slater. His recipes are beautiful, unfussed-with charms, and his book, The Kitchen Diaries, demonstrates the philosophy that just about anything that is pleasing and delicious can make up a meal. Nigel ate these puddings on Valentine’s Day, and although I had them about six weeks too early, I’m surely glad that I did.

With just a handful of ingredients, and only two mixing bowls, when throwing the ingredients together, I started to wonder how they would taste. But upon baking, the aromatic smell of chocolate melting in the oven told me that these little puddings, dark and brooding, would be divine. With a crisp shell, and the look of a fallen soufflé, the pudding was light– almost airy in consistency. And the flavor was just right– not too over-the-top, nor too rich. The puddings called out for a bit of unwhipped cream to make the whole mess even more of a treat.

Give these puddings a try. Even the non-dessert lovers or the Brians that you are cooking for will love them.

Hot Chocolate Puddings
from The Kitchen Diaries

serves 4-5

7 ounces dark fine-quality chocolate
1 cup sugar
3 eggs
2 ounces butter
2 heaping tablespoons chocolate-hazelnut spread

Preheat the oven to 400 degrees. Lightly butter four (or five) small, ovenproof ramekins.

Break chocolate into small pieces, then melt in a double boiler. Meanwhile, separate the eggs, putting the yolks in a medium-sized mixing bowl with the sugar. Beat until thick and creamy. Place the egg whites in a large bowl, whip until airy and almost stiff.

Stir the butter into the melted chocolate. When the butter has melted, add the chocolate-hazelnut spread stirring to combine. Fold the chocolate mixture into the egg and sugar, then carefully fold in the beaten egg whites. Be careful not to overmix, but make sure there are no streaks of egg white that are unincorporated.

Scoop the mixture into the buttered ramekins and place on a baking sheet. Bake for 15-20 minutes. Pudding should rise a bit, with the tops being cracked with the centers remaining molten. Should you open one too early, or would like it more baked, these puddings can simply be popped back into the oven.

Pin It
January 1st, 2009

Happy 2009!

Well, it was time to do a little spring cleaning, or windy, snowy January cleaning as it may be. In its older iteration, this blog served me well, as a place to post what I have been cooking in the kitchen– and it still is. But I thought that it could use a bit of face-lifting, donning a new outfit to get the year off to a good start. You know how it is, sometimes you need a brand new dress to wear in order to face all of the exciting tasks at hand.

So I hope that you enjoy the newer, slicker, more streamlined version of Nosheteria. Have a wonderful New Year, here is to a fabulous 2009!

Pin It
December 23rd, 2008

One Last Thing

Now I know that you all are getting ready for your festivities this Christmas, and I, as a lapsed Jew, am getting ready for my festivities– gathering with my people at the movie theater (any suggestions?) followed by some Chinese food. But I have to leave you with just one more recipe before the year is through. It’s a good one. And those of you who are feeling especially ambitious this holiday season, might even mix up a batch to eat Christmas Eve.

Popcorn-Peanut Brittle– the name is a lesson in onomatopoeic alliteration. My mom was telling me about her newest travails in candy making with this recipe. Although she burned the sugar syrup the first time around, the second time worked like a crispy, sugary dream. I am always up for a project, so while heeding her warnings, I dove right in to the caramel making, hard-ball heating process with gusto. The combination of popcorn (light and airy) and peanuts (salty and substantial) was too much to resist.

There is something so exciting about cooking sugar. Something so sweet, and seemingly innocent, turns into a molten, singe-the-skin-right-off-your-hands, dangerously sticky concoction when boiled and cooked to the right temperature. It is in the danger that the interest dwells.

This recipe, though sticky, and potentially harmful, is relatively easy to make. Although, I must admit, I got my husband to help me out by pouring the syrup while I furiously tossed the popcorn and nuts. (My husband can be rented out for a nominal fee–very nominal!–if you choose to make this recipe for yourself at home.) And the taste… is super. Do you remember Fiddle Faddle? That crunchy, popcorn snack that you could just eat and eat, (that’s what I did anyway)? This brittle is like that, only ten times better. Saltier, sweeter, buttery-er. And if this is your first venture into the world of candy making, like it was mine, it will only want to make you have more hot sugary experiences.

Have a wonderful holiday season, with or without a batch of Popcorn-Peanut Brittle!

Popcorn-Peanut Brittle
from The Good Housekeeping Cookbook

This is the recipe as stated, however, I didn’t have salted peanuts so I added a bit more salt than listed, and gave an extra sprinkling of Kosher salt to the brittle when drying. This gave the candy more of the salty-sweet flavor that I love.

2 1/2 quarts popped corn (approximately 3/4 cup of kernels)
1 lbs. (2 1/4 cups) light brown sugar
1/2 cup light corn syrup
1/2 cup water
1/2 cup (1 stick) butter
2 teaspoons salt
1 tablespoon vanilla
1 cup salted peanuts

Preheat oven to 250 degrees. Pop the corn, place in a large roasting pan in the oven to remain crisp and warm. Make syrup.

In a dutch oven, over medium heat, place sugar, corn syrup, water, butter, and salt, and melt, stirring occasionally. Continue stirring, until a candy thermometer reaches 290 degrees, the hard-ball stage. This can take anywhere from 20 to 30 minutes. Remove from heat and stir in the vanilla. The syrup will bubble up on contact, keep stirring.

In a large buttered pot, place the popcorn and peanuts. Slowly pour the syrup on top, mixing with a wooden spoon until the popcorn and nuts are well-coated. Work quickly, as the syrup will harden, and mixing will become more difficult.

Spread the mixture onto two lightly buttered, jelly roll pans. Butter your hands as the syrup will still be hot, and could burn your hands, and separate popcorn clusters into bite-sized pieces. Brittle should continue to harden, and become more chewy as the mixture cools.

Pin It
December 17th, 2008

It's Brussels Sprouts!

Ho hum. No introduction need be made to the humble brussels sprout. But come every fall and winter I eat so many of these little cruciferous vegetables, it is not uncommon for my skin turn a pale green color, and begin to flake off oddly in the shape of sprightly leaves. The brussels sprout is hardly some new genus, like the broccolini, and it is not some young thing, like the baby carrot, but this oldie is definitely a goody.

Come October, when the weather begins to cool, and it starts to get dark obscenely early, I begin to tote home parcels of sprouts from the market. And eat them I will, in a variety ways. Roasted, shredded, or steamed. With pancetta, or browned butter, doused in olive oil, and sprinkled with coarse salt. Mmm, yes, I love the brussels sprout. I eat so many of them, that I am always looking for a way to spruce up the standard.

I recently bought a Craig Claiborne cookbook from the 1970’s. Filled with many tempting recipes, while perusing through, I noticed a recipe for side dish which featured my favorite sprout—Brussels Sprouts in Cream. This recipe comes from an article in The New York Times on November 17, 1974 about what to cook for Thanksgiving dinner. It’s nice to know that I have some of the same ideas about this feast as Mr. Claiborne.

So, on December 15, (I had brussels sprouts of a different sort on turkey day) these brussels sprouts were on my dinner table, and they were delicious. The recipe called for parboiling the brussels sprouts before baking. Now I am a child of the 1980′s a time of alfalfa sprouts and tofu in California, so I almost never boil my vegetables. But following the recipe I made a shallow incision at the base of each sprout, and plunged them in water. The incision, and the boil seems to be a necessity in this case, as the water ensures tenderness throughout the sprout.

I made the light cream sauce (I added a touch of nutmeg), then baked and broiled away. Pulling the dish from the oven, the sprouts were lovely and burnished, standing tall amongst the pool of sumptuous sauce. Piping hot, the sprouts were a treat. The cream sauce had thickened, almost curdling around each brussels sprout, so each bite offered both vegetable and sauce. This recipe will definitely become one of my sprouts standards.

Brussels Sprouts in Cream
adapted from Craig Claiborne’s Favorites from the NY Times

serves 6-8

1 1/2 lbs. brussels sprouts
salt to taste
3 tablespoons butter
3 tablespoons flour
1 cup cream or milk (I used milk, and the sauce was still creamy)
1 egg yolk
a touch of freshly grated nutmeg (optional)
1/4 cup grated Parmesan cheese

Preheat oven to 375 degrees.

Clean and trim the brussels sprouts, making a shallow incision in the shape of a cross on the stem end. Place the sprouts in a skillet, add cold water to cover, and salt to taste. Bring to a boil and simmer for 10 to 15 minutes, or until crisp-tender. Drain.

Melt 2 tablespoon butter in a saucepan. Add the flour and stir with a whisk until smooth. Add the milk or cream, stirring vigorously until thickened and smooth. Season with salt and nutmeg. Remove from the heat, and stir in the egg yolk.

Select a casserole dish large enough to accommodate the brussels sprouts in a single layer. Melt the remaining butter in the casserole, then add the sprouts. Carefully spoon the sauce over the sprouts, sprinkle with cheese and bake for 12 to 15 minutes. Run the dish under the broiler for a few minutes to ensure a crispy, brown finish.

Pin It
December 8th, 2008

Introducing Helen Corbitt

Do you know of Helen Corbitt? Well, I hadn’t until just over a week ago. Brian and I had taken a few days in Philadelphia. I had never seen the Liberty Bell, or Independence Hall, or had eaten at Reading Terminal Market (amazing!). While we were strolling through Old City, we stopped in a used book store. It smelled musty, with creaky floorboards, and bookshelves that were so tall and crammed so tightly with books, the Californian in me was immediately made wary of earthquakes. I love a good used bookstore, and New Haven, although it is ultimately a college town, has a paucity of them. So I made a beeline for the cookbook section in this particular store, and there I stumbled across Helen Corbitt’s Cookbook.

I love vintage cookbooks, they tell stories of times past, what foods were in fashion, and what sorts of dinner parties were being thrown. It makes me wonder what future generations will be thinking when they glance through titles such Sunday Suppers at Luques or Chez Panisse Vegetables or read the chronicles of molecular gastronomy. Helen Corbitt’s book was from 1957, and was splattered with remnants of food from some other cook’s experimentation. With retro recipes for Chop Suey and Mushroom Rarebit, this book is a compendium of mid-century American cooking. As I continued to glance through it, my eyes fell upon a recipe that sounded so bizarre, yet so oddly delicious, I knew that this book would be coming back to Connecticut with me– Peanut Butter Bacon Bread.

Later that week, I had the book sitting on the coffee table, when one of our guests for the Thanksgiving feast proclaimed, “Oh, Helen Corbitt! I love Helen Corbitt!” I was surprised, asking him who Ms. Corbitt was. “She was the director of Neiman-Marcus department store’s food service program. She is a really big deal in Texas.” A little post-holiday Googling and it turned out Ms. Corbitt, a New York native, went on to have a successful career as a cookbook author, food writer, and chef in Texas, where she was hired originally to manage the tearoom of The University of Texas, but was wooed away by the head of Neiman-Marcus. She died in 1975, leaving behind an illustrious career, and many recipes that the restaurants at Neiman-Marcus still use today. Oh, and she was also known for her intriguing food combinations– hence the Peanut Butter Bacon Bread.

The recipe reads like the delicious, artery-clogging quick bread that it is. With very little leavening, only one egg, and a handful of heavy ingredients, I felt like the recipe could be tweaked a bit for a more modern palate. But I just had a feeling the bones of this recipe would be a winner. That salty-sweet combination, rich peanut butter, smoky bacon, and a fair amount of sugar, the bread sounded just weird and wonderful enough.

After mixing, loading the bread pan (which now seemed to weigh a ton) into the oven, and smelling the rich peanuty fragrance, I could hardly wait to taste this concoction. Well, let me say that this bread was terrific. Dense, with a crust that was sturdy and shielding the moist interior, this quick bread highlights its two stars– the peanut butter and the bacon. The crumbled bacon was chewy, almost dissolving into the bread itself, and added the perfect salty foil for the sweetness of the bread itself; and the peanuts were crunchy, especially those lodged into the surface of the crust. If you are looking for just something bizarre enough to be utterly delicious this holiday season, I would highly recommend baking a loaf of this bread. And you can thank Helen Corbitt for the recipe.

Peanut Butter Bacon Bread
adapted from Helen Corbitt’s Cookbook

The original recipe called for both a cup of chopped peanuts and crumbled bacon chips. This seemed like a bit much to me, so I cut both portions down to one-half a cup, and I used crunchy peanut butter.

Makes 1 loaf

1 cup sugar
1 tablespoon melted shortening
1 cup milk
1 egg, well beaten
1/2 cup crunchy peanut butter
1/2 teaspoon salt
2 cups flour
3 teaspoons baking powder
1/2 cup chopped unsalted peanuts
1/2 cup bacon chips, crumbled (from approximately 6 slices of bacon)

Mix sugar, shortening, and milk with beaten egg. Mix in the peanut butter, using an electric beater if necessary. Add salt, flour and baking powder, mixing until all ingredients are well-incorporated. Fold in nuts and bacon chips, and let stand in a greased, floured bread pan for 20 minutes.

Bake at 350 degrees, for 1 hour, or until a tester (toothpick) comes out clean from the center of the bread.

Pin It
November 30th, 2008

Leftovers: Pilgrim's Pie

Did all of you have a nice Thanksgiving? It’s hard to believe this Fall holiday has come and gone as quickly as a potato waiting to be mashed. Now, gearing up for the Christmas holidays begins. I must say, that for as excited as I get each November, I am always happy to say goodbye to my gravy boats and my roasting pans until next year. For as festive as Thanksgiving may be, it always makes me feel like I have been run over by a freight train for the few days following.

Away go the potatoes, scrape the bowl clean; the stuffing is neatly wrapped in crinkly foil; cranberry relish is nestled in Tupperware containers, waiting to dye the plastic; globs of congealing gravy go into the fridge; and the crowning achievement, the bird, is sliced and ready to be saved. Just like the shopping list of ingredients that was drawn up to make the meal, I can now tick off, each leftover component.

Perhaps I have mentioned it before, but I am not the biggest fan of leftovers. Wait, wait. Let me rephrase that: I am not the biggest fan of my own leftovers. Chinese dinner, the next day for lunch is quite alright. Reheated Indian food is divine. But having a meal that I prepared? Meh. But I am getting better. I have found that the same food, minimally fussed with, but artfully combined to make a new-ish dish– that I can do. It becomes a little game of trickery.

Take for instance Saturday night’s dinner, a little something I called Pilgrim’s Pie. It is an ex-Californian-now-New-Englander girl’s excuse for Shepherd’s Pie…or, simply put, it’s just another way of using up all of those Thanksgiving leftovers.

One giant mess of carbohydrates– with a little bit of turkey thrown in for good measure. Layer one was the stuffing, and I always make a traditional bread stuffing. Layer two, a thin slick of cranberry relish accented with orange peel. Next comes the turkey, shards of succulent white meat. Then the gravy, rich and smooth, and the crowning glory, soft peaks of mashed potato. I baked the “pie” at 400 degrees for 30 minutes. The mashed potatoes got crispy, their peaks burnished by the heat of the oven, and the layers of leftovers melded together to make one familiar yet still unique November supper. The meal required just about all the effort I could expend after a long holiday weekend, but brought back all the wonderful flavors of the meal…till next Thanksgiving.

Pin It
November 19th, 2008

Curds Worth the Wait

I always buy all of the November food magazines. I like to see what menus the editors have planned for the gluttonous holiday, Thanksgiving. Sometimes I find a recipe for yams that looks tempting, or a new way to shred my brussels sprouts, but usually I stick to the tried and true standbys that I love to make each fall. What can I say? I am a traditionalist. But the magazines stay dog-eared, pages crumpled beside my bedside table for the whole month of November.

But this November was different. Amongst the recipes for Fennel, Red Onion and Focaccia Stuffing, which I won’t be making, I saw a recipe for homemade ricotta cheese in Food and Wine magazine. Well, I love a good project. And if that project involves a mess of milk, a bit of cream, and not a whole lot else, well– even better. Off to the market I went, returning home with a small bag of ingredients, and the will to make cheese.

First I cooked my milk and cream to 185 degrees. Turning off the stove, I then added three tablespoons of white vinegar. I watched as what moments ago was a steaming, luscious vat of smooth milk became a clumpy, curdled mass almost immediately. I added a bit of salt, continued stirring for a few seconds more, then covered the milk with a clean cloth and let it set for two hours.

Setting a cheese cloth-lined colander in a large bowl, I scooped the curds that had risen to the top of the milk mixture out with a slotted spoon. What was left, was quite a bit of whey, and a portion of milky white curds. I then gathered up the corners of the cheese cloth and tied the cloth to a wooden spoon. This created a hammock for my curds to continue to drain off whey.

After one half hour, the curds were sufficiently drained, I untied the cheese cloth and unfurled my handiwork. One taste of this ricotta, still warm from the cooking, and I was in milkmaid heaven. The taste is clean and pure, hardly salted, it is more of a texture rather than a flavor. I have eaten ricotta of all sorts: freshly made by a cheese monger, conventionally made and ready to be served from plastic containers, and now homemade. And let me tell you, the homemade is the best– hands down.

Although I could have eaten this ricotta plain, like yogurt, I restrained myself. I served it in a variety of ways in the passing days: stirred into a risotto-like dish; spooned on top of plump, homemade gnocchi; dabbed on an apple galette; and spread on crusts of bread, crostini style. The process may take awhile, but the ricotta is definitely worth the wait.

The complete recipe can be found here.

Pin It
© 2024 wordpress test site
all rights reserved