November 14th, 2008

And His Bucket of Parts…

I never had a Mr. Potato Head. Although I always wanted one. Call it an early fixation with food, or maybe it was that I always had an appreciation for polymorphous objects, but I admired that tuber. I guess it can be simply put– I love oddly shaped fruits and vegetables.

Last week, I squealed with glee when I spotted this baby at the farmers market. “Look,” I exclaimed to Brian, “it’s better than a potato-head! It’s a potato-man!” It was weighed by the vendor (and it was a weighty starch), and I put it in my satchel. There it sat on the kitchen counter, offering me company, and a smile (mine, not the potato’s) whenever I was in the kitchen.

But alas, the potato was consumed. It’s limbs were lopped off and I made a rosti, or a large, shredded potato cake later that week. It was delicious, crisp and golden-brown, with just the right amount of chewiness. I said the Kaddish, then ate up! Just kidding…

In other news: You might notice a little something new, on the right-hand side of this site. It’s a picture, and a link to my upcoming book. Lately, there has been a bevy of manuscripts, emails, and a healthy dose of me pulling at my already cropped locks. But this week I sent the final proofs back to my editor. I can hardly believe the whole process is winding down. And that whooshing sound that you just heard? Oh, that was just me breathing a huge sigh of relief.

Pin It
November 5th, 2008

Celebratory Biscuits

Comfort food soothes– hence the name. For the last week I have been glued to the television set, waiting for one talking head to convince me, to quell my nerves, to, for lack of a better word, soothe me. When I realized that the news could never do this for me, there was only one thing left to do. Go to the kitchen. I flipped through cookbooks, opened cabinets, sifted through drawers full of gadgets, and finally arrived at quick and delicious recipe I had yet to try in this book.

I do not come from the South, so biscuits for me usually came out of a cardboard tube. And as much as that pop, followed by a sigh, that came from opening up the container thrilled me, I realize now, after making the real thing, just how much I was missing out upon. These biscuits mixed up in no time, could be made with ingredients that were already in my pantry, and once baked, were light as marshmallows.

There is something so comforting about kneading a bit of dough, warming the kitchen from the heat of a gas stove, and waiting for a finished product to be complete. Steaming hot from the oven, slathered with sweet butter, and a bit of honey these biscuits did just the trick. Who knew that all I needed were some carbohydrates in the form of bread products to ready me for the deluge of news programs to come?

Last night, I sat down in front the television, nervously tapping my foot for hours on end, and watching my husband on the other end of the sofa chew his nails to the quick. And as the hours ticked by, the biscuits that were once eaten in solace, now became celebratory. I began to think about how these biscuits were also the perfect medium for shortcake, or spooned and baked on a winter cobbler. It’s funny how a good recipe, and a bit of excellent news can do that for a person.

Grandmother’s Southern Biscuits
from The New Complete Book of Breads

This recipe came with a long list of do’s and don’ts by Southern cooks for making heavenly biscuits. The one prescriptive I found to be the most most helpful is the handle and knead the dough as little as possible. By kneading only 5-10 times quickly, the glutens do not fully develop, leaving you with a lighter final product.

makes approximately 12 biscuits

2 cups flour, sifted
1 teaspoon salt
1 tablespoon sugar
4 teaspoons baking soda
1/3 cup shortening (I used the trans-fat free Crisco)
1 1/4 cup milk

Preheat oven to 500 degrees.

In a mixing bowl sift together all of the dry ingredients. Cut in the shortening with your hands or a pastry blender, until a lumpy, coarse meal is obtained. Pour in all of the milk at once. Stir with a fork, or a wooden spoon until mixture just comes together. The dough should be wet, but still retaining shape. Add more milk if the dough is a bit dry.

Gather the dough into a ball and place on a floured surface. Sprinkle lightly with flour. Roll, or push out the dough to 1/2 inch thickness. Cut into 3 inch rounds, knead any scraps gently together, and cut again. Place biscuits on a greased or Silpat lined baking sheet. Bake close together for soft-sided biscuits, 1 inch apart for crusty sides.

Bake on the middle shelf of the hot oven for 8-10 minutes. Enjoy immediately.

Pin It
October 20th, 2008

One of My Stinkier Sidedishes

What does one head of roasted garlic, a chopped hard-cooked egg, and a few crushed, flash-sauteed anchovies get you? The most delicious, albiet peculiarly stinky side dish I have made to date. Now I don’t suppose the average Jane would find this rather rustic dish pleasing. But let me assure you that the smell dissipates, and what you are left with is a wintry assemblage of hearty ingredients ready for the eating.

The combination of cauliflower and egg may be familiar to some, it certainly was to me. This duo was often made by my mom; then, it was just an altogether different dish. She would steam a batch of snowy-white florets, mix them with a bit of melted butter, season with salt and pepper, and then plunk a sieved hard-boiled egg on top. A very hard-boiled egg. With a bluish cast to the yolk, a springy white, and a sulfuric smell that made my little body cringe. I was not fond of eggs of any sort as a child.

Well, I got past my egg phobia, (along with my slippery fish phobia). I cook my eggs a bit differently than my mom. I like to think of my hard-cooked egg as just set– the oxymoronic hard-cooked egg, if you will. The yolk just barely holds together, never crumbly, and almost sumptuous in nature. Cauliflower I love, especially roasted, doused with olive oil. With an exterior that is crisp and an interior that is chewy and pleasingly soft, cauliflower is a thing of cruciferous beauty.

This is a dish that warrants experimentation. Roast a head of cauliflower, broken into florets, tossed in olive oil, salt, and pepper, at 400 degrees for about forty minutes. (I used a golden cauliflower. Not much different in taste, but a pop of bright, yolky color.) Meanwhile, drop an egg or two into gently simmering water for 10-11 minutes. Peel the eggs, and coarsely chop. Crush a few oil packed anchovies (more for a bracing, briny flavor, less for the timid), and saute briefly in olive oil. Then assemble your side dish. Layer the roasted cauliflower on the bottom, sprinkle with chopped egg, drizzle with anchovy-oil mixture, and strew with freshly minced parsley.

I jest about the stench of this side dish. It smelled wonderful, and tasted deeply savory. However, this is not a dish for those meek of taste. But served with a roasted chicken, it was a warm and satisfying meal.

Pin It
October 15th, 2008

Cheesy Serendipity

At my birthday dinner a clean, white plate was presented at the dinner table. It housed a circular configuration of tiny gougères, still warm from the oven. An amuse bouche, if you will, something salty and savory to start the meal off right. They were thoroughly enjoyed, not a crumb left in sight. And I thought to myself, I should make those, emboldened by my baking adventures as of late.

Then I received Alice Waters’ latest cookbook The Art of Simple Food, as birthday present. It looked lovely. Clear and concise, it appeared to be less of a cookbook by a noted chef, and more of a wonderful resource for the home cook. I glanced through it quickly that night, but had to wait a few days until my birthday guests left, and I settled in nicely to my new round (meaning 30!) year. Finally opening up the book for my first substantial read, I was immediately struck by the rather unconventional layout. This is not your typical cookbook, with lists of ingredients, then followed by text telling you what to do with the aforementioned ingredients. Rather, the ingredients are highlighted amongst the text. Telling the reader exactly what to do with the ingredients, and when. It makes sense, doesn’t it?

Many of the recipes are basic, or simple as the title suggests. But we all know that sometimes it is the most simple of ingredients that makes the delicious of meals. When I got to the chapter entitled A Little Something, having to do with snack foods and tapas, I was thrilled to see gougères. Reading through the mere handful of ingredients, and the nonthreatening explanation, I knew I had to give these cheese puffs a try.

Made with a dough very similar to a choux pastry dough, whenever I had seen anyone make cream puffs or profiteroles, a pastry-making chill would run down my spine. I think it was because the final product was so impressive, I thought, how could the baking process be anything less than a pain? Not so! The puffs were a snap to make, and with plenty of Gruyère cheese mixed into the batter were delightfully salty with a snap. My gougères baked up like a dream, and I, ate them hot from the oven, as recommended. The outside was crusty and crisp while the insides were eggy and moist. They may have been even better than the gougères that were served at my birthday dinner.

Gougères (Cheese Puffs)
from The Art of Simple Food

makes approximately 20 puffs

1/2 cup water
3 tablespoons butter, cut into small pieces
1/2 teaspoon salt
1/2 cup flour
2 eggs
3 ounces Gruyère cheese, grated (about 3/4 cup)

In a small, heavy bottomed saucepan, heat without boiling, water, butter, and salt. When the butter has melted, stir the flour in, all at once. Keep stirring vigorously until the mixture coheres, and pulls away from the side of pan. Keep stirring for another minute over the heat. Dough should be a smooth mass. Transfer to a mixing bowl to cool slightly, stirring will speed up this process.

Beat in each egg, one at a time. Egg should be thoroughly mixed into the dough before the next is added. Stir in the grated cheese.

Preheat the oven to 400 degrees. Line a baking pan with parchment. Spoon the dough onto baking sheet, approximately 1 tablespoon in diameter, and about 2 inches apart. You may need to smooth each spoonful with a wet finger, or gougères can be piped out, using a plain 1/2 inch tip.

Bake undisturbed for 10 minutes at 400 degrees, then drop the temperature to 375 degrees and continue to bake for 10-15 minutes. Gougères should be golden brown and outside. With a sharp knife, pierce the bottom of each warm puff, to let out any steam, and help the puff stay crisp. Eat right away, or puff can be reheated at 375 degrees for 3 minutes.

Pin It
October 9th, 2008

Delicious Alliteration

It all started with this bread. I know, I know, could I be any later to the game? I read about it, heard about, saw it posted on YouTube, but I had never made it. It almost seemed too de riguer; I can be funny that way. But late this past summer, nearly two years from the original publication date, I broke out the yeast, and gave it a try. And this created a monster.

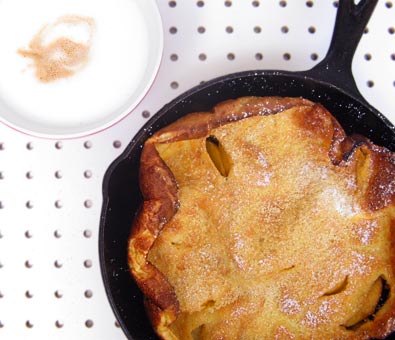
The no-knead bread was more than adequate. A beautiful crunchy loaf with corn meal along the crust, but let’s be honest, while this bread is super in a pinch, it lacks real taste. It also lacks something that I have come to love– the knead. (You think I would have gotten that from the name.) There is just something so satisfying about plunging your fist into a mound of bubbly, warm dough. But this bread did inspire me to not be terrified of yeast, to let my curiosities run wild and to make bread. Lots of bread. I love the gratification that comes with the process of making bread– and it is a process. But for a homebody like myself, there is nothing better than puttering around the house and tending to a lump of dough every few hours.

Let’s just say I no longer buy my yeast in packets, like most normal people. I have graduated to buying my yeast in the more economical jar. Yes, the jar. Before this summer I did not even know that this was possible. I have made rich white loaves, Frissian loaves, whole wheat-lemon loaves. There were the challahs that I made for Rosh Hashanah (L’Shana Tova!), and then there was the ever classic, so classic they might have been forgotten, Parker House Rolls.

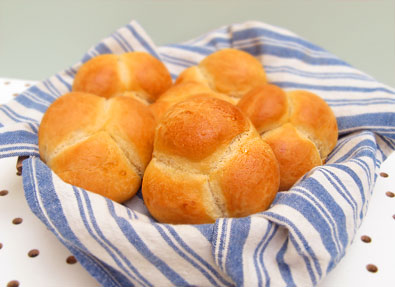
I found a tattered copy of Beard on Bread at a used bookstore before my interest in baking bread had truly blossomed. I guess that I was a sucker for the anagram in the title, and the sing-songy alliteration. But when I opened the book again, just a few months after purchase, I was taken with the ease of the recipes, and with James Beard’s straight-forward approach. I decided that these Parker House Rolls would be my venture into Beard’s bread land. And the rolls did not disappoint.

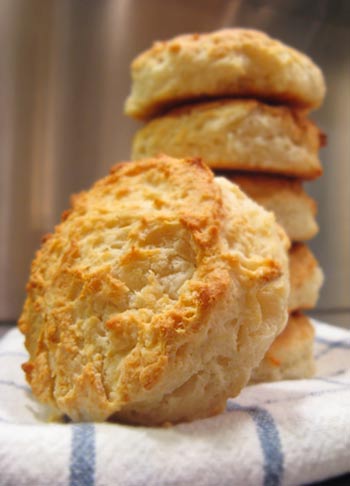
These rolls reminded me of the dinner rolls that my grandma purchased each year for Thanksgiving. Light yet rich, almost delicate, these rolls were terrific straight from the oven. I slathered them with sweet butter, and then drizzled them with honey. As a mid-afternoon snack they were delicious, and were even wonderful warmed slightly the next morning for breakfast.

This recipe is originally doubled making 30 rolls, but this is half a recipe.

Parker House Rolls
adapted from Beard on Bread

1 package active dry yeast
1/2 tablespoon granulated sugar
1/4 cup warm water (100-115 degrees)
2 tablespoons butter, cut into small pieces
1 cup warm milk
2 1/2- 3 cups all-purpose flour
1 teaspoon salt
2-3 tablespoons melted butter
1 egg, beaten with 2 tablespoon cream or milk

Dissolve the yeast and the sugar in the warm water getting bubbly, and allowing to proof. Melt the 2 tablespoon of butter in the warm milk, then combine with the yeast mixture in a large bowl. Mix 1 cup of flour with the salt, and add to the yeast. Stir vigorously with a wooden spoon to make a dough. It should be wet and sticky, if dough does not come together, add a bit more flour. Cover the bowl with plastic wrap, and set in a warm place to double in bulk. About 1 hour.

Stir the dough down with a wooden spoon. Add 1- 1 1/2 cups more flour, 1/2 cup at a time. At this point the dough should be easy to knead. Turn out the dough on a well floured surface, and knead until smooth and very elastic. Dough should not be overly sticky, add more flour, one tablespoon at a time, if this is the case. Let the dough rest a few minutes. Form a ball, put into a buttered bowl. Turn the dough over, so the surface is covered with butter. Cover and put in a warm place to dough in bulk again. This can take anywhere from half an hour to an hour.

Punch the dough down, turn out onto a lightly floured surface, and let rest for several minutes. In the mean time, take a medium-sized muffin tin, and butter each cup well with the remaining melted butter. Cut off small pieces of dough, about golf ball size, and roll into a ball. You should have approximately 36 balls of dough. Place 3 mounds in each muffin cup. It is fine if the dough does not touch, it will be allowed to rise and grow once more. Fill each prepared muffin cup, and allow rolls to rise again until doubled in size.

Brush each roll with egg mixture. Bake in a preheated 375 degree oven for approximately 20 minutes. Rolls should be golden brown when finished.

Pin It
September 29th, 2008

Post Haste

Recently, I was invited to a small party. It was at a typical apartment in a college town, a house that had been sub-divided, all sharing a front door. Paint was peeling off the door jamb, and the remnants of stickers from some forgotten band, no doubt a favorite of the previous tenants, were stuck to the front windows. The door was answered, hugs exchanged, then our host led us out back. “I know it’s a little cold, but we’re taking advantage of the weather while we still can. Grab a blanket if you want one.”

The e-vite had read, “Bring a dessert, we’ll supply the wine!” I placed my pie on the table, next to the brownies supplied by one guest, a chocolate fiend no doubt, and the figs supplied by a health nut, and then I sat back down to enjoy the backyard. The house may have been typical, but the backyard was not. Overgrown, but in an English garden sort of way, brambles grew next to tomato plants. There was a trickily pond off in the corner, and the centerpiece of the garden was a gazebo covered in grape vines unfurling their leaves. Twinkling lights wound through the vines, giving off an attractive light, making my pie which had baked unevenly look toasty brown all over.

Conversation flowed, as did the wine and the Slivovitz, a distilled plum liquor supplied by our host. But as I stood under the arbor, I just could not stop thinking about all of those grape leaves, barely beginning to turn the colors of autumn. Bolstered in confidence from a few sips of the Slivovitz, I hatched a plan: pluck, pluck, tear, pluck. “What are you doing?” asked Brian, as he watched me snatching grape leaves from the vines.

“I can’t let all of these beautiful leaves just go. There has got to be something I can do with them,” I proclaimed stuffing untarnished leaves into my pockets. I circled the gazebo continuing the hunt for leaves that had yet to be marred by the fall season, and remained supple enough to play with. By the end of the evening, I went home with the burning feeling of Slivovitz in my esophagus, and my pockets full of grape leaves. I put the grape leaves in the fridge until I figured out what to do with them.

The following day, a stack of leaves now placed on my desk, many Google searches, and far too many dolmas recipes to count, it seemed I was on my own as to what I would make from my leaves. I didn’t have enough to make piles of dolmas, but what about wrapping these leaves around something else altogether. Like salmon…

So that was what I did. I blanched my fresh grape leaves for a few minutes in some boiling, salted water, to make them more malleable. I then wrapped the leaves around some salmon filets, seasoned just with salt, pepper, and a bit of olive oil. After wrapping, I then seasoned the leaves with salt and pepper, and gave the newly wrapped filets another glug of olive oil. I then popped them in a 425 degree oven for 12 minutes. (I don’t like my salmon well-done.)

This dish was simple to the extreme, but had that special, homemade quality due to the grape leaves. When baked, the leaves became crisp, almost like a Mediterranean nori. The salmon was moist and flavorful, tinged with the flavor from the leaves. Of course, I’m not sure how practical of a recipe this is for Nosheteria. I’m not sure how many of you have access to a grape arbor, or even one measly vine, but if you do, I strongly suggest you go plucking before the season is gone.

Pin It
September 22nd, 2008

Doughnuts? Why not!

I’ve been thinking a lot about dough lately–kneading it, pressing it, watching it grow, baking it, and of course, frying it. Maybe I should actually amend the previous sentence to read: I’ve been thinking a lot about fried dough lately. There is nothing like a good doughnut, or a fritter, or a beignet. If my doughnut consumption was in direct proportion to all of my doughnut thinking, no doubt I would be an enormous, sugar-kissed young woman waddling towards you, her hands coated in chocolate glaze.

Perhaps it is the shape of the doughnut, that pleasing circular form, that begs for constant thought. It is the ideal form– symmetrical from all angles, but also a continuous surface. You can start at one point on the doughnut, travel a circuitous path, and end up right back where you started. That is if you did not munch your way through this path. And with the hole, the doughnut is a circle, wrapped within a circle. What could be better than that?

When one starts to contemplate various types of doughnuts, and various types of glazes, toppings, and fillings, the possibilities grow exponentially, making the mind reel. I will be waiting in an endless line at the post office, the type of line that seems to just exist, adding more and more patrons to the end while never really eliminating any patrons from the beginning. It is the sort of line that makes me want to shoot myself in the foot. My mind wanders to doughnuts as of late, and I begin to list the permutations. There are raised, and cake, those filled with creme and those filled with jelly, chocolate glazed, iced and sprinkled. I have never, in all of my doughnut eating years, run into a chocolate raised doughnut. Not a plain raised with chocolate glaze, but a chocolate raised doughnut. Why is that? And then the line that I am waiting in actually begins to move, and I am in a better mood because of my doughnut reverie.

But when it comes down to it, the simple, homemade raised doughnut comes closest to my ideal, and apparently to others too. I made a batch of these doughnuts and brought them with me to drinks with friends. And, I couldn’t have been more popular. Yes, a dirty martini and a glazed doughnut, I am told is the perfect combination. The doughnuts were delicious, light and yeasty, just barely glistening with oil. The glazes were simple yet flavorful, just hardening slightly to obtain that sugary shell.

As I watched my friends so pleased to have a taste a true Americana, I knew that I had made the perfect treat. I might have been the only one in that crowd of people that thinks about fried dough incessantly, but I was not alone in my love for a little bit of sugar and grease.

Glazed Doughnut

Recipe found here. This recipe makes a lot of doughnuts, so share them with friends, and you too will be very popular.

I used the listed recipe for vanilla glaze, but substituted vanilla paste, with real vanilla bean seeds for the vanilla extract. For the chocolate glaze I used this recipe:

Chocolate Glaze

4 ounces semi-sweet chocolate
3 tablespoons unsalted butter
1 1/2 cups sifted confectioner’s sugar
3 tablespoon water

In a double boiler, melt chocolate and butter until liquid. Slowly add in the sugar, stirring well after each addition. Add the water until desired consistency is reached. Glaze should be smooth and viscous.

Dip plain doughnuts into glaze, then allow to dry slightly on a wire rack before serving.

Pin It
September 11th, 2008

To Market, To Market…

It’s nice living within a walking distance from a thriving farmers’ market. Each Saturday morning, after a strong cup of coffee, and a slice or two of toast, I grab my Moe’s tote (a proud relic of my Berkeley days) and Brian and I take a stroll down to Wooster Square. I peruse what the vendors have for sale each week, and although it is fresh, bright, and bountiful, I must admit, it is standard fare. The summer squash is just zucchini, there are a few peaches, but simply the yellow sort, and although the tomatoes are plentiful, there are just a handful of the heirloom variety. As I pick up my bundles it is hard for me not to remember the potato man at the Union Square Greenmarket fondly, and to think back to the multi-colored hues of a California cauliflower. (I know, I know, I’m just feeling sorry for myself. But it gets better!)

And then there was last Saturday, and the find of the summer. “What’re those? They look like tomatillos, but smaller,” I asked Brian as we wandered through the stalls. We made a bee-line for the vendor selling these peculiar looking vegetables.

“Is that a tomatillo?” I ask the kid behind the table.

“No, but good guess. They’re ground cherries. Do you want to try one?” he asked.

I nodded quickly, always affirmative when it comes to samples at the farmers’ market. I peeled the papery husk, and a small, sunny yellow orb came rolling out into the palm of my hand. Popping the vegetable into my mouth, it felt like a cherry tomato, bursting with juice, with crunchy seeds, and a smooth skin. But it was sweet, much sweeter that its cousin the tomato, and without any of the tart punch of its false cognate, the tomatillo.

“Wow, excellent. I have never seen those anywhere else. What do you do with them classically?” I asked.

“Just eat them. Although I’ve been told you could make a pie out of them. But that’d be sort of expensive.”

I glanced at the price, at $5 for less than a pint, that would be one delectable, though expensive dessert. I bought my box, and couldn’t wait to get home to try a few more. It always seems strange to equate one food to another, but how else is one supposed to describe a new taste? The nearest fruit I can compare the ground cherry to is the kiwi, a bit acidic, giving way to a gentle sweetness. Brian said they tasted a bit vegetal, like a green bean. I could see this as well, but if ground cherries were green beans then they would be the sweetest, juiciest green bean known to man.

This weekend we are having friends over for dinner. If the farmers’ market has more ground cherries, I think I know what we’ll be having for a first course.

Pin It

I was recently talking with some friends about summertime desserts. Mainly about how much I love them. Got a cobbler? Send it right on over! Peach pie is divine! Plum cake? Superb! And then I mentioned an old stand-by for me– the clafoutis. No crust to beat down with a rolling pin, it uses whatever fruit of the season you choose, not quite a cake, not quite a custard. Simple, delicious, and my own prerequisite, great for breakfast the next day. The clafoutis is pretty close to perfect.

One of the conversation’s participants, Seth, had never heard of the clafoutis, much less eaten one (don’t worry, that will be remedied), but he asked if they were anything like a dutch baby. Well that opened up an entirely new can of worms, as some people had never eaten those either. I know, I know, what a culinary conundrum, and a fascinating conversation for a Saturday night. I went on to explain the differences between a clafoutis and a dutch baby (a clafoutis has a different proportion of egg to flour to milk, and its sweeter and denser). Seth went on tell us this:

When he was in high school, and the first snow of the season would fall, he and all of his guy friends, knock-kneed and skinny, would not go to movies. Nor did any of these boys have girlfriends to cuddle up with. They would collect, en masse, at each others house, play Dungeons and Dragons for hours, and as the clock struck midnight, and the boys got ravenously hungry, they would mix up a batch of dutch babies. Quickly, they wolfed them down, as teenage boys are wont to do, dusted with powdered sugar. “Yes, that’s what nerdy boys did in the ’80′s in Westchester County.” Seth shrugged, resting his hand on his lovely wife’s shoulder, clearly pleased that those days of torment, pegged jeans, and heavy metal hair bands were far behind him.

Well, all I could say was, if I ever knew a boy that made dutch babies as his recreational activity in high school– I would have swooned. But I guess that goes to show, one person’s frog, is another’s prince charming. And all of that talk about eggs, fruit, and oven pancakes, got me thinking about dutch babies, and wondering why I hadn’t made one in quite some time. So I made a seasonal version of the baby– one with a sliced peach sauteed in the pan, kissed with sugar, and lightly tossed in cinnamon.

This dutch baby was a divine alternative to the standard, plain, or the more wintry version with sauteed apple. The peaches were delicate and sweet, the pancake eggy and neutral, and puffed up, hot from the oven– pretty darn impressive. I ate mine with a dollop of vanilla yogurt. Yum.

Peach Dutch Baby

4 eggs
1/2 cup flour
1/2 cup milk
pinch salt
1 peach, peeled and sliced into 1/4 inch slices
2 1/2 tablespoons unsalted butter
2 tablespoons brown sugar
1/4 teaspoon cinnamon

In a mixing bowl, whisk eggs until well-blended and a bit frothy, about 1 minutes. Sift in flour, and blend until smooth. Add pinch of salt, and milk, and mix well. Set aside.

In a 9-inch, cast iron skillet melt 1 tablespoon butter over medium heat. When foam subsides, add the peach slices. Saute until warmed through. Add the brown sugar, and the cinnamon, continue to saute until sugar is melted and the peach begins to soften. Add the additional 1 1/2 tablespoons of butter, and melt completely.

Pour in the egg mixture, making sure that the peaches are evenly dispersed. Bake in a preheated, 425 degree oven, for 20 minutes. Pancake should be puffy and brown, and will fall somewhat upon removing from the oven.

Pin It
August 26th, 2008

Lazy Cockles

I love to entertain. The days before I have a dinner party are spent ruminating over what I will serve, deciding what is at the peak of freshness, thumbing through food magazines for inspiration, furiously cleaning the apartment, and oh yes, thinking of how each of my guests will get along with one another. Though I may think long and hard, about what foods to serve, often times I resort to the same standbys. In the winter this usually means an entree that is hearty, rib-sticking, and often times braised. This way I can prepare it, and forget about it for hours, letting the oven do its work.

But in the summertime, when the weather is warm, and the produce is displaying its array of bright hues, I favor salads. But salads? Some guests may be a tad disappointed when they sit down for a meal at my house, and all that I serve are some beautiful sliced tomatoes, their juice spilling out over crumbles of feta cheese, and doused with some heady olive oil. As delicious as this sounds to some, others may desire a little something more. I get it–enter the cockle.

Cockles are so simple to make– I have composed salads that are more labor intensive. The smallest type of clam, they offer up a sweet, briny mouthful of the ocean to diners. My favorite way to eat them is to pluck them from the shell using an empty shell as pincers. Set just a bit of roughly chopped garlic to saute in some olive oil in a deep sided dutch oven. The cockles go tumbling in, closed mouth like a child who got into her birthday cake too soon, some freshly squeezed lemon juice (and go ahead chuck in the rinds), a twisting of cracked black pepper– no salt is needed as the cockles retain much of their salty ocean water– and on goes the lid. Wait five minutes, remove the lid, and a puff of sea air rushes upwards to meet your nose. If your cockles aren’t opened yet, give them a few more minutes on the stove.

In keeping with the summer attitude, the cockles can be eaten hot from the stove, or mellowing to a pleasant room temperature. I’ve been making grilled tomato bread to go alongside them. Slices of baguette, grilled to a crisp, rubbed with a garlic clove, and then smeared with a cut Roma tomato. What you are left with is juicy tomato pulp and seed. All that is needed is a drizzle of olive oil, a sprinkling of salt and pepper, and a proper dunking in the broth that is created from the cockles.

Pinch. Dunk. Repeat. That is what I call the perfect directions for a summertime meal.

Pin It
© 2024 wordpress test site
all rights reserved