January 29th, 2007

Barking Up the Chocolate Tree

Psst, come in close; I’ve got a secret for you. Yes, it’s true I’m a California girl, a place where fresh produce abounds, and Alice Waters is the gastronomical mother of us all. And if you’ve been reading this blog for awhile, you know that now I have moved to New York City, great big city, great big food. But my mother is from South Dakota…land of presidents carved into mountainsides, motorcycle-riding festivals, Jell-o salads, and casseroles. So I guess you could say, I have a bit of white trash in me…and I mean that in only the kindest of terms.

And with this white trash culture, comes white trash cuisine. Last night I may have been munching on a salad of arugula, dates, and blood oranges, but last week, it was all about homemade chocolate bark made with– hold onto your hats– soda crackers. I guess you could say it’s a culinary dichotomy; a little bit of the good, mixed in with the bad, gives you light, salty-sweet chocolate bark.

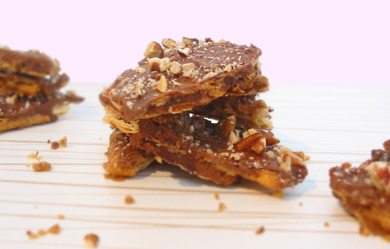
I went to a holiday party last week (yes, I realize it is January, but better late than never) at a kindred spirit’s house, a girl with a similar background, but more so– her mother was once Miss North Dakota! She passed around a tray of this bark, that looks very much like English Toffee, adorned with a sprinkling of pecans. Everyone loved it. And I couldn’t get enough of the crispness, swathed in a caramel-like concoction, and the salty-sweet combination that has become so popular in baking now a days. She told me that the bark was not purchased at some tony sweet shop, that she had made it; and then she gave me the secret ingredient. Soda crackers! I was both enamored and aghast. But the recipe sounded familiar. My friend said that the recipe came from North Dakota, where it’s widely known about, and constantly made.

I dashed home, and poured through a family cookbook, and there the recipe was– soda cracker cookies. I couldn’t believe the brief list of ingredients, and how simple it was to make. Simply boil one cup of packed brown sugar, and one cup of butter for 2-3 minutes on the stove. Ready a lipped baking sheet, by lining with foil, and grease with a light film of vegetable oil. Pour the mixture over a single layer of soda crackers. The mixture should cover between 40-48 crackers. Bake the crackers in a preheated 375 degree oven, until the cracker begin to float on top of the syrup, about 5-10 minutes. Meanwhile melt one bag of milk chocolate chips (about 2 cups) in the microwave. When the crackers come out of the oven, pour the chocolate over, then sprinkle with some finely chopped nuts. I used pecans. Let the pan cool, and harden in the fridge if you’re impatient, on the counter if you’re not. Then break into manageably sized pieces, and heartily gobble up.

I can be a bit of a food snob. No canned vegetables, no casseroles, and I thought, no recipes that called for soda crackers or cracker crumbs. But maybe I will have to rethink that last rule. Because apparently people in the middle of this country have it going on.

Pin It
January 25th, 2007

Sweet Tart

Behold, the beautiful quince. Feel the weight in the palm of your hand, the smooth, cool skin protecting the firm flesh…and that lovely fragrance. A scent that is intoxicating, perfumey, deeply musky, the scent of apple and pear, that is if those two fruits went on some tropical holiday, vacationing somewhere warm. The bouquet is heavy yet soothing. It is almost worth cutting into and taking a slice to eat raw. But alas, this is not a fruit for the faint of heart, or sweet of tongue. Sad but true, the quince really must be cooked prior to eating.

Puckery and tart when consumed raw, gentle and sweet when allowed to cook, the quince is definitely a fruit that is worth the cooking time. I poached mine simply. Peeled and quartered, I then dropped the fruit into some simmering water. I allowed the quinces to simmer for a bit (15 minutes) undisturbed. Then I added enough sugar to taste (about one cup for 3 quinces), some fragrant vanilla, and continued to poach until the fruit was soft enough that a knife slipped smoothly into the flesh.

And then what? Well, there are many options really. Foremost, you can gobble them up as is, adorned simply with a bit of the poaching liquid. You can reserve them to add to any cake or pie that calls for apples. Making quince jam is always an option, but sterilizing and cleaning countless Bell jars was more than I could put up with. And so I went the simple route; I made quince scones.

For the scones, I used this recipe. And as I gently needed the dough prior to cutting into ragged triangle shapes, I added poached, then cooled quinces, roughly diced into 1/2 inch pieces. The kitchen filled with a warm and fragrant aroma when baking. And while I munched on my homey breakfast that day, I savored the delicate taste of the quince, mingled with the tender sweetness of the scone.

One delight replaces the other. Long gone is the almost overpowering fragrance of the nubby, bright chartreuse quinces, but here to eat are the exquisite quince scones.

Pin It

It is true, in my past, leftovers were not my friends. I just was particular about what foods I would consume day in, day out. Eating for lunch the same items that I had prepared for dinner the night before was a less-than-attractive proposition. So, I would pile all of my leftovers onto Brian, and off he would go to work with a leftover lunch. But then something happened…I moved to New York…and my refrigerator shrank (along with my closets, but that’s another story).

Don’t get my wrong, I still cook, all the time in fact; and I haven’t exactly perfected the art of making small portions, just enough to feed two hungry mouths, so leftovers abound. There are times when the leftovers are literally overflowing out of our miniscule refrigerator, and so I too, not being a blatant, wasteful human being, have had to learn to eat up what I have made. But I still haven’t gotten the knack for snacking on a pre-tasted meal. So that means that I have to be somewhat creative.

I had roasted little fingerling potatoes as a side dish for dinner. They were sweet, and buttery, crisp-skinned, and tender on the inside, and seasoned simply with sprigs of fresh rosemary, salt and pepper. But I didn’t just feel like zapping them in the microwave, and going for a hearty round two. So I sliced an onion, and sauteed it in butter, then placed the potatoes, cut-side up with the onion in a heavy bottomed skillet. In went some eggs, enriched with creme fraiche, along with another sprinkling of salt and pepper. I popped the entire mess under the broiler. It puffed, and browned, getting perfectly done.

And there you go– a leftover roasted potato frittata. The eggs were luscious, the potatoes starchy and filling. And who doesn’t love a frittata, especially the leftover variety?

Pin It
January 19th, 2007

My City, My Cookie

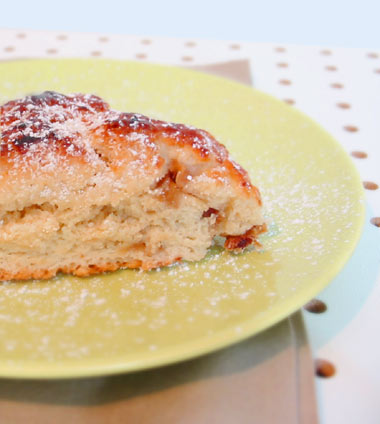
I have become a woman obsessed. (Which actually isn’t anything too new.) I am not obsessed with gleaming jewels, fancy cars or even couture dresses. My obsessions are much more quotidian, though if you ask me, they are just as difficult to obtain. I am obsessed with a cookie– a cookie from the great City Bakery.

Count me among the many food bloggers who love this place, and amongst the thousands of New Yorkers who adore their chocolate chunk cookies. Yes, from my first taste of that quite large, deep brown cookie, with bittersweet chocolate chunks nestled into the rich dough– I was hooked. And I became obsessed with recreating them at home. But I do not live next door to this delightful bakery cum restaurant; I do not even live a handful of subway stops away. So I vowed to find that recipe somewhere.

Well…I couldn’t find it anywhere. That recipe must be a well-guarded secret, passed down to the bakers at City Bakery, hand-written on some tattered piece of paper, marred with chocolate smears, and bits of dried egg. In other words I could not find that recipe anywhere on the Internet. And I looked. For days. Pouring over websites that mentioned even the word “city” in them, and there were a lot, but I could find nothing. So I made a batch, well, several, myself, trying to recreate the perfection.

And I will be the first to admit that a City Bakery cookie these are not, but they are the best homemade chocolate chunk cookie I have ever eaten. And the key to these cookies is simply melting and browning the butter prior to blending it in the batter. The aspects of a City Bakery cookie, which I tried so hard to emulate, are the caramel color and depth of flavor. Browning the butter was the key. It produces a cookie that is crisp on the outside, chewy and delectable on the inside. These cookies are large in size, and with chunks from a bittersweet chocolate bar inside, they are sweet (it is a cookie after all) but without being cloying.

So (sniff sniff), these cookies will have to do, at least until some disgruntled employee from City Bakery publicizes the recipe on the Internet for all the world to see. But they are a pretty close second, so I won’t feel too bad for eating them right up.


Bittersweet Chocolate Chunk Cookies

I make these cookies with pieces from a bittersweet chocolate bar, but they could be made with semisweet or dark chocolate, if you prefer. I buy a bar, then break off chunks to create a difference in size and shape.

1 ½ cups all-purpose flour
½ tsp. baking soda
½ tsp. salt
1 stick unsalted butter, browned and cooled
1 ¼ cup dark brown sugar, lightly packed
1 ½ tsp. vanilla extract
1 large egg, plus 1 egg yolk
4-5 oz. bar semi-sweet or bittersweet chocolate, broken into chunks

Sift together the flour, baking soda, and salt into a medium bowl and set aside.

Using a standing mixer fitted with a paddle attachment or a hand mixer, cream the butter and sugar on low speed until it is smooth and lump free.

Add the vanilla, egg, and egg yolk and beat on low speed for 15 seconds, or until fully incorporated. Do not overbeat. Stop the machine and scrape down the sides of the bowl and the paddle.

On low speed, add the flour mixture in stages. Beat until just incorporated. Scrape down the sides of the bowl. Add the chocolate chunks and mix with a wooden spoon until they are just incorporated.

Preheat oven to 350. Adjust racks to lower and upper thirds of the oven. Line two baking sheets with parchment paper or Silpats. Spoon the dough into golf ball sized portions. Batter should make approximately 12 cookies.

Bake for 13-15 minutes or until golden brown around the edges, turning the sheets front to back and switching racks halfway through. Remove from the oven, and put hot cookies on a cooling rack to let cool and settle.

* To brown the butter, melt butter over medium low heat in a silver, or light colored saucepan. Butter will melt and pop, then begin to change color. Swirl pan, butter will begin to smell nutty, and should be removed from heat when it is caramel in color. About 3-5 minutes. Put brown butter in a large mixing bowl to cool before adding the rest of the ingredients, about 20-30 minutes.

Pin It
January 16th, 2007

Die Wahlverwandtschaften

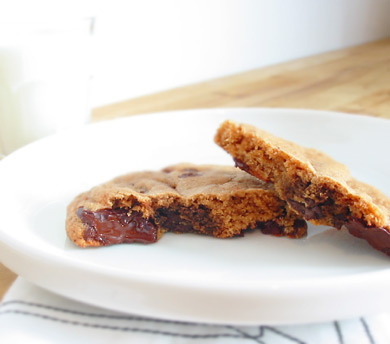
That’s a mouthful! At least for English speakers. But rather than choke on polysyllabic, antiquated German words (definition to follow shortly, keep reading), why not gobble down some lovely, subtle brandade instead? And just what is this warm dip? Allow me to explain…

Brandade, a settling and satisfying, warm dip, hailing from the south of France, is made with reconstituted salt cod (or bacalao) and mashed potatoes. Now, this combination might sound unsettling to some, but I assure you, it is divine. Delicately seasoned, with Dijon mustard, sauteed onions and a bit of thyme, the dish is really a combination of all these ingredients, but is so much more than merely the sum of its parts.

The dish does take some time to assemble, but the actual cooking time is fairly short. The salt cod must be soaked in cool water and refrigerated for 24 to 48 hours. On its own, salt cod can be a bit of a bore to the American palate. You could say, with its flaky texture and pallid color, it’s even the potato of the sea– pleasantly bland and willing to take on whatever flavors surround it. But, when mixed with the rest of the ingredients, and baked in a ramekin until golden brown– mmm-mmm. The salt cod becomes transmogrified, baked into a delicious spread, topping a thin slice of baguette or even a crostini.

The salt cod and the potato, two ingredients which are frankly a bit insipid on their own, seem to share an elective affinity. They possess a special chemical bond, and when they meet, they change themselves into one transcendent hors d’oeuvres. Two ingredients, one a protein, the other a starch, spinning around each other in an inexorable vortex of mutual attraction! Whew! I know I’m getting a bit over-excited here, but the dip was just that good. And seriously, potato and salt cod really do make for an ideal union, sort of like the elective affinities that Goethe wrote about in his great novel, Die Wahlverwandtschaften. If you would like to read it, go to the library, but if you would like to make this luscious brandade, the recipe is here.

Pin It
January 9th, 2007

Green Up Your Meals

And I don’t mean eat lots of dark and leafy greens, although they can be delicious, and hearty. I mean, why don’t you make a bit of tomatillo salsa to have in the fridge? My condiment of choice this week has been this salsa, to have on top of just about anything.

Sure, we all know the typical chips and salsa pairing, and it’s great– a standard. But as an accoutrement to chicken cutlets, pounded, aggression-releasing, with a kitchen mallet, then dredged and fried in crisp cornmeal, what could be better? Or what about baked, as the liquid to savory Mexican-style rice, sound good? I haven’t thought of a way to incorporate the salsa into a dessert, but give me a bit of time.

Tomatillos, the star of this condiment, are like tomatoes, in that they are members of the nightshade family; but that is where the similarities end. Tart and acidic, they are the green fruit that you taste in many Latin American dishes. Ranging from 1-2 inches in diameter, with a papery, inedible husk, tomatillos are relatively easy to find in American grocery stores, and most definitely in Latin American markets. A good thing because I know that you all will be running out to purchase them as soon as you know how simple the salsa is to make.

The only things required in this assemblage are a blender or food processor, and your oven, since this is a cooked salsa. With just a handful of ingredients, you can make up a batch of tomatillo salsa anytime you choose. The recipe I used comes from the incomparable Mary Sue Milliken and Susan Feniger restaurant The Border Grill, and can be found in their cookbook Mesa Mexicana.

Roasted Tomatillo Salsa
from Mesa Mexicana

Makes 2 1/2 cups

1 pound tomatillos, husked and washed
6-8 garlic cloves
1-2 jalapeno peppers, stemmed and seeded if desired
1 bunch cilantro, leaves only
3/4 cup water
1 teaspoon salt
pinch of black pepper

Preheat the broiler. Place tomatillos, garlic, and jalapenos in a baking tray. Broil, turning frequently, until evenly charred, 15 minutes. The trick to keeping the garlic from burning is to tuck it under the tomatillos. Remove from broiler and set aside to cool.

Transfer the roasted ingredient to a food processor. Add cilantro and water, and puree until smooth. Season with salt and pepper. Store in the refrigerator for 3-5 days, or the freezer for weeks.

Pin It
January 5th, 2007

Sour Lemons and Good Friends

My stay back in California was filled with good friends, family suppers, and delicious food. It was lovely to be back as a guest in the place that I called home for so many years; sort of like being a tourist without any of the annoying guidebooks, iffy meals at unknown places, and the pressure of trying to do too much. I had dinner one night in San Francisco with a dear friend at a restaurant that is hardly new, but is always stupendous. My friend ordered a starter salad of fried oysters and fried Meyer lemons on a bed of frisee.

A nibble of her salad and I was hooked on those lemons, so tart, pleasantly acidic– delicious. It’s been two weeks since since I have returned to my new home, and I couldn’t stop thinking of that darn fruit, shared with a friend over a leisurely dinner. So the next best thing to flying back to San Francisco and kidnapping my dinner companion, is going out and buying Meyer lemons, and making them at home.

So sunny and bright in flavor, and so easy to make, these lemons were the perfect use of a seasonal fruit. Meyer lemons, as opposed to the traditional variety, are less puckery, with a soft (and edible) skin. They have all of the flavor of traditional lemons, but lack the acid punch that makes one purse their lips. Don’t get me wrong, they still are lemons, with all of the tart flavor, just not so much. Cut into narrow slices and then fried, these lemons produce a quick jolt of flavor.

I simply washed the lemons well, and sliced them carefully, rind and all, to 1/8 inch thickness. I dipped them in egg, to help the dredging ingredients stick, then heartily dredged in a mixture of cornmeal and flour. I heated up a combination of olive and canola oils in my cast iron skillet; then fried away. And they fried quickly, popping and splattering the whole way through. About a minute per side, and soon I had small mounds of sweet/sour Meyer lemons. Sprinkled with salt, and placed, still warm, on my own bed of frisee, I tossed them in a dressing made with– what else?– Meyer lemon juice. An ideal lemon salad, minus the San Francisco coast, and the company of a good friend.

Pin It
January 2nd, 2007

Happy Daikon!

Happy New Year! I must say that come January 2, gifts passed around, ornaments strewn about, and merry friends seen, I am happy to get back to the real world…at least for awhile. My New Year’s Eve was a quiet one, dinner with good friends, a little sake and some good conversation. But come New Year’s Day, I still felt the need to cleanse the system of all of the holiday’s rich food and drink. And what better way to cleanse my system? With a lovely salad of course.

Now you knew that I wouldn’t ring in 2007 with a big bowl of iceberg lettuce, would I? So just what is this rosy salad that I threw together? A grated daikon salad, adorned with baby buckwheat greens, and shavings of purple cipollini onions, that’s what. I was feeling less than inspired when I arrived at the Union Square Greenmarket on Saturday, but a quick stroll around the market (which was surprisingly empty for a weekend), and stumbling upon a vendor with all sorts of fabulous root vegetables, got me to thinking about a Japanese style salad starring that smooth Japanese root vegetable– the daikon.

For those who have yet to try this radish, it can be found in many grocery stores and markets, especially Asian. With its creamy, but often dirty skin, and its mellow yet peppery taste, this vegetable is wonderful steamed, or peeled then grated. But beware, when peeled and grated, despite its delightful flavor, prior to dressing, the daikon does have a pungent, sulfuric odor. But what’s a little sulfur amongst friends? Just consider yourself warned.

Crisp and snowy, the daikon was awaiting a simple vinaigrette (both to mask the stench, and to complete the salad). A twist of lemon juice, a shake of rice wine vinegar, a dash of olive oil, a drop of toasted sesame oil, a bit of soy sauce, and an acidic vinaigrette was made, keeping the ratio of acid to fat about 50-50. The darkness of the vinaigrette tinged the daikon, taking the color from shockingly white, to a muddy beige, but when I added the feathery buckwheat greens, with their soft pink stems, and the ruddiness of the onions, the salad became less just about the daikon, and more a conglomeration of all three ingredients.

So there you have it, I rang in the New Year with a bit of asceticism. I have the rest of 2007 to make room for gluttony.

Pin It

Well, Jack Frost was not really nipping at my nose this holiday season. It’s been surprisingly warm here in New York, but I still felt the need to get into the holiday spirit. What better way to get into that spirit than with fresh, straight-from-the-oven, roasted chestnuts? And they really couldn’t be any easier to make.

I had eaten chestnuts, fresh from the shell once before as a child. I had taken winter holiday with my family in England. We were out for an evening stroll at a holiday fair, the air was bitter cold, my nose was turning rosy from the temperature, and my hands were jammed into my dad’s pockets. (His hands were always warm, no matter the temperature outside.) My dad stopped to buy a little glassine bag of chestnuts, that truly were roasting over an open fire. Quickly I grasped the bag, anxious to receive any bit of warmth from this new snack food. Slowly I pried the nut from its hardened exterior and tasted the mellow, sweet flesh. I remember holding the nut on my tongue for far too long as it grew soggy and began to disintegrate, but I was hoping to warm myself from the inside out.

It’s funny how I had forgotten this memory until I was at the market last week, and literally bumped into a container of imported Italian chestnuts. Shiny and raw, they were simply crying out to be taken home. But what to do with a chestnut and no open fire? Well roast them in the oven that’s what, and here’s how: It is important to score the bottom of each nut with an “X.” This causes the steam to be released, and the nut becomes much easier to peel. Then roast in a 425 degree oven for 20-30 minutes, or until the shell begins to blister and crack. Remove from the oven, and peel to your heart’s content, when the nut is cool enough to touch, but still warm enough to make your mouth purse when you take that initial bite.

Chestnuts are so pleasing when peeled. They look like golden little brains, and are delightfully simple in taste– rich, slightly sweet, and meaty. I ate some unadorned, standing in the kitchen, peeling then eating, peeling then eating, a gentle rhythm guiding me through the process. When I had my fill of eating, I continued to peel. I then crushed the remains, and had them that evening sauteed in butter, and added to brussel sprouts– a true winter time treat!

If you haven’t had roasted chestnuts yet and want to give them a try, have no fear now that Christmas time is over… There is always New Year’s!

Pin It

This post is originally from Jan. 30, 2006. In the winter I find this granola, packed with dried fruit, and flaked coconut, particularly sunny.

There is quite a bit of lore surrounding granola, and I’m not exactly sure why. I do not chug shots of wheatgrass juice before delving into a cup overflowing with fruits and nuts scavanged on my last camping trip, but I do enjoy a good granola from time to time. But I am particular about just what goes into my granolas– no sunflower seeds, no walnuts, not too much cinnamon, and preferabley no raisins. See…picky. So the easiest way for me to enjoy my fiber, is to make it myself.

So there are many ingredients that I do not favor in my granola, but just what do I like? Well, in the batch that I made there were coarsely chopped hazelnuts, shavings of dried coconut, chopped dried apricots, a handful or so of dried cherries (for sweetness), and of course, rolled oats. Simple and delicious, the granola was lightly kissed with cinnamon, and flavored with a touch of pure vanilla.

How did granola get its oh-so-healthy reputation, when in fact many recipes for it are drowning in vegetable oil, and struggling under mounds of sweeteners? All granola does not have to be this way. In fact this granola uses no unsightly oils, but it does rely upon a bit of melted butter. The butter, when melted, becomes toasty, lending a richness to this cereal. First, melt 2 tablespoons of butter in a saucepan, then add 1/2 cup of chopped nuts, and toast gently over medium heat. The nuts will begin to brown, contributing to the toasty flavor of the butter. Then 1/4 cup of brown sugar, 2 teaspoons of honey, and 1/2 teaspoon vanilla extract are added to the nut mixture. Continue cooking over low heat until the sugar has melted, about 3 minutes.

Then it’s time to go wild, add the nut mixture to 1 1/2 cups rolled oats, and any other ingredients you like. I added 1/4 cup chopped dried apricots, 1/2 cup flaked coconut, a handful of dried cherries, and a light dusting of ground cinnamon. Toss the granola mixture well, as you want the butter to gently coat the oats. Bake on a parchment lined cookie sheet at 325 degrees for one half hour, tossing every 10 minutes. Your granola should be golden brown, and the dried fruit should just be beginning to color.

Then each time you dig in to a batch of your own homemade granola, you too can kick off your Birkenstocks, sway calmly to Sugaree , let your braided hair down, and be proud of the nourishing food in which you are about to take part.

Pin It
© 2024 wordpress test site
all rights reserved