June 5th, 2006

The Three C's

Each summer in Oakland there is a large carnival that comes to town a few times during the season. Driving along the freeway you will see it in the distance; the outline of the rickety Ferris wheel, neon lights a-glow; the tilt-a-whirl spinning around at breakneck speeds. Each year I squeal with joy at its arrival, and remark to Brian that we will have to return when we have ample time to experience the three C’s. What are the three C’s you ask, scratching your chin inquisitively?They are Corn Dogs, Carnies, and Cotton Candy, of course.

And each year, no matter how much I diligently swear to make it over to the Alameda County Fair, I inevitably miss it. I can merely reflect on the halo of the ferris wheel, never having experienced it first-hand. (In fact, I don’t think I would even go on the rides; there is just something monumentally unsettling about going on a ride that can be packed up, and journey to the next town on a moment’s notice.) So, sad but true, it has been far too long since I have partaken of the three C’s in concert. But I will take any one of the three C’s any way I can get it; even if that means creating it myself.

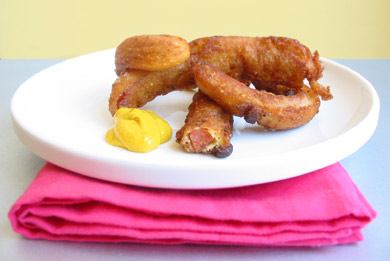
When I saw this recipe for Curly Corn Dogs in last August’s issue of Food and Wine, I knew it was one to keep. And it only took me just about a year to make these fried packages of greasy goodness. Slightly different from the standard corn dog, which are deep fried on a stick, these corn dog curls are sliced lengthwise, into hot dog batons, then dipped into a moderately sweet, cornbread batter. Then the batons are fried in a shallow pool of oil, where they achieve their moniker of curl by bending slightly, due to their stick-less nature.

These corn dogs were definitely odd, squirming around in a pool of oil, but they were pretty darn good. Crisp outside, with a greater, pleasing ratio of cornbread to hot dog, they did just the trick to curb my longing for a morsel from the fair. I will always miss the carnies, looking haggard from one too many years on the road, and one too many children crying that they want to go on the tilt-a-whirl one last time. And the cotton candy, spun into a pastel cloud, and plunked onto a cardboard cone, will sadly be missed. But it’s nice to know that I can at least get a little taste of the county fair whenever I choose.

Pin It
May 31st, 2006

Fiddlin' Around

I live around the corner from a pretty amazing market. A place where six different varieties of eggplant happily cohabitate with mounds of garlic chives, where buckets of freshly made tofu sit chilling not far away from briny, sea-water oysters. This time of year, with such a bounty of produce, is a superb season to experiment, experience new flavors. Whenever I see something at the market I have yet to try, something that peaks my interest, I have to give it (or them in this case) a shot.

I had read a lot about Fiddlehead Ferns in cooking books and magazines, but here in California, these beauties, scavenged in the wild by foragers, were only culinary lore. I never had seen them at any grocer’s or farmer’s market. So when I saw them at the market, curled up tightly like a porcine tail, I just had to buy a passel to bring them home and cook some delightful side dish.

From my reading I knew this was a vegetable that had to be cooked. The curl is inedible, making the eater sick when ingested raw. So I guessed a giant salad of fiddleheads would be out, unless I really was not fond of my fellow diners. But I wanted a simple dish, optimally displaying the fiddleheads, and decided on a simple saute. With sliced shallots, some olive oil, a dab of butter, and salt and pepper, I sauteed the fiddleheads until softened. Then I added some corn, freshly sliced from the cob, and flash sauteed, for a bourgie succotash of sorts.

And what did it taste like? Fiddleheads have a flavor that is almost indescribable. Delicate and subtle, I noticed the texture more than the actual flavor. They tasted of moss, and the woods, with a flavor slightly akin to asparagus. But it was the shape that was most pleasing to me. The curl of the fern unfurls a bit upon cooking, making a wobbly, circular shape. One that is unlike anything I have eaten in nature.

The corn was sweet, the shallots gave the dish a subtle oniony tinge, but would I make fiddleheads again? Probably not, or at least not this same way. The fiddleheads were beautiful, there is something appealing about looking down at your plate and seeing an unusual snail-like object waiting to be gobbled up. But is novelty really enough? For me, I think it is probably not.

Pin It
May 25th, 2006

They're Back!

Every Saturday morning my local PBS station plays cooking shows. Jacques Pepin has been a long time mainstay in the line-up. So I guess you could say that I have grown up with Jacques Pepin over the course of many a Saturday morning. I love the man. But maybe in his old age, he has gotten health conscious, perhaps a little too health conscious if you ask me. On numerous occasions he expounds on the virtues of fruit for dessert– just fruit.

Now Jacques is not talking about pies, cakes adorned with fruit, or even baked fruit of some sort. He is speaking about good ol’ sliced fruit, with maybe some booze spilled over top for good measure. I love fruit as much as the next girl; there is nothing better than the perfect peach, juice dripping onto your chin in those warm summer months. But if I were to dine at Jacques Pepin’s house in Connecticut some evening in late spring, where we would share a delightful meal and stimulating conversation, and then dessert would roll around, my stomach eagerly gurgling at the thought of some chocolate coated masterpiece, and if he came merrily out of the kitchen with a bowl of pineapple spears with a bit of rum poured on top…I would be PISSED! I would expect such behavior from a novice chef– but this is Jacques Pepin!

On the other hand, if I were to go to Australia to have tea with the young, superstar chef Bill Granger, author of Bill’s Open Kitchen amongst others, and he came strolling merrily out of his kitchen, a pot of tea in one hand, and a lovely Apricot Slice in the other… I would be thrilled! It’s not that I’m against having fruit for dessert, its just that a little something must be done to it.

Apricots are back in the market in California, and I couldn’t be happier to see my sweet, stone fruit, friends again. It has been a long and rainy winter, one filled with far too many oranges and grapefruits to count. But the stone fruit is making its first appearances, and bringing cherries, and numerous other berries with it. This recipe is simple and superb, and was one of my favorites from last summer. A dense, vanilla sponge cake with halved, fresh apricots baked on top, the cake is not too sweet, making it the perfect snack for an afternoon tea. With apricots still slightly tart, yet getting carmelized by the addition of some raw sugar part way through the baking process– this cake is what I’m talking about when I mean fruit for dessert.

Apricot Slice
from Bill’s Open Kitchen

1 1/2 cups all purpose flour
3/4 cup sugar
1 teaspoon baking powder
a pinch of salt
3 eggs
1/4 cup milk
2 teaspoons vanilla extract
6 1/2 ounces butter, softened
10-14 apricots, pitted and halved
2 tablespoons additional sugar

Preheat the oven to 315 degrees. Grease a 9-by-13 inch baking pan, and set aside.

Sift flour, sugar, baking powder, and salt into a large bowl. Make a well in the center. Place eggs, milk, and vanilla in another bowl, mix to combine. Pour the egg mixture, and the butter, into the well of dry ingredients and beat for 2 minutes, or until smooth. Spread the mixture into the prepared baking dish.

Push the apricot halves, cut side up, evenly into the batter, in approximately 4 rows of 7. Place the cake in the oven and bake for 20 minutes. Remove from oven, sprinkle additional sugar over cake, and bake for another 20 minutes, or until a toothpick comes out clean.

Cut into fingers with 2 apricot halves per slices, and serve.

Pin It
May 22nd, 2006

Cool as a Cucumber

With all of the different types of cucumbers at the market these days, you never know what you are truly getting. Watery and insipid, or crunchy and crisp, the adjectives vary as much as the cucumbers themselves. But I do like a good cucumber, and watery as they may be, they also taste of summer: light, refreshing, and cool.

You have your regular, garden variety sort, with the tough green skin almost pimply, and overflowing with seeds waiting to be discarded before consumed. Then there is the English cucumber, virtually seedless with a tender, edible skin. A pickling cucumber that is diminutive, and just yearning to be brought home and soaked in some briny solution, is next on the list. And finally, you have the slightly more difficult to find, Persian or Japanese cucumber. This is the baby of them all, no larger than your hand, virtually seedless, supple skin, and crisp. The perfect cucumber to cook with, or not to cook with for that matter.

I bought some Persian cucumbers recently, and wasn’t sure what to do with them. Slicing them up and putting them in the run of mill tossed salad seemed a bit bland for these beauties. But what about a salad of cucumbers, and only cucumbers, something to exemplify their cucumber-y nature? What I came up with was a slightly confused, but altogether delicious mess of cucumber squiggles, using up a few choice ingredients I had lying about my kitchen.

This salad in done on the mandoline, but could just as easily be composed with a good vegetable peeler. Shaving long threads of cucumber, gives the salad a subtle crunch, and some visual interest. A chopped red chile adds a piquant kick, playing off the cooling aspect of the cucumber. Finally, just after dressing, and before serving, the salad was finished with a sprinkling of freshly crumbled Feta cheese, giving the salad a much needed saltiness.

I made a simple dressing of rice wine vinegar, a touch of sesame oil, some sugar, and a squeeze or two of fish sauce. I wanted the dressing to be slightly vinegary, brininess being such a good compliment to the mellow crunch of the cucumber. Poured over the salad and gently tossed, the dressing made this slippery salad of cucumbers the perfect accompaniment to any summertime meal.

Pin It
May 18th, 2006

Simple but not Skimpy

Simple can mean many things: stripped down, easy, commonplace, or everyday. Today it has become a bit of a catch phrase when referring to those typical 30-minute meal options. But simple can also mean pure, unadulterated…delicious. This is the type of simple I mean when talking about Vanilla Bean Cream Cake.


Pure unadulterated vanilla, a tender, pound cake-like crumb, perfect for dessert, or even with a cup of coffee for breakfast (cake being the breakfast of champions, of course), the cake was simple, but it was also complex. This cake is definitely ingredient-heavy. With 5 eggs, butter counted not by sticks but pound measurements, and flecked with real vanilla bean seeds, this cake was not necessarily simple in its composition, but rather simple in its taste.

So I went to the library again, this time to scour the shelves for a good baking book. And I found one; Lisa Yockelson’s book Baking by Flavor, is a compendium of all things sweet. With chapters divided into flavors like: Buttercrunch, Apricot, Cinnamon, Lemon, and of course Chocolate and Vanilla, this book had me drooling over nearly every page. But sometimes it is the simplest flavors that standout the most, and that was definitely the case with this cake.

Now this is not a cake to just be tossed together; ingredients are carefully measured, sifted, and thoroughly creamed, make a fluffy batter and a dreamy cake. This cake may not look like much, but let me assure you that it is. In fact, my sister loved it so much, that upon tasting it she requested that I make this recipe each week for her to enjoy with a cup of evening tea. We’ll see about that… 

Vanilla Bean Cream Cake
from Baking by Flavor

Vanilla Butter and Cream Cake Batter:

2 1/2 cups unsifted bleached all-purpose flour
1 cup bleached cake flour
1/2 teaspoon baking powder
1 teaspoon salt
3/4 teaspoon freshly grated nutmeg
1/2 pound (2 sticks) unsalted butter, softened
1/2 cup shortening
seed scrapings from a plump vanilla bean, reserving the pod for glaze
2 3/4 cups plus 1 tablespoon superfine sugar
2 3/4 teaspoons vanilla extract
1/2 teaspoon almond extract
5 large eggs
1 cup cream

Vanilla-Rum Glaze for Brushing over the Warm Baked Cake:

1/3 cup granulated sugar
1/3 cup water
reserved vanilla bean pod, cut into 2 inch lengths
2 teaspoons dark rum
1 1/2 vanilla extract
1/4 teaspoon almond extract

Preheat the oven to 325 degrees. Grease the inside of a plain 10 inch tube pan with shortening. Line the bottom of pan with a circle of parchment paper, cut to fit, and grease the paper. Dust the inside of the pan with flour, and set aside.

Sift the all-purpose flour, cake flour, baking powder, salt, and nutmeg.

Cream the butter and shortening in an electric mixer, on moderate speed, for 4 minutes. Blend in the seed scrapings from the vanilla bean. Add the superfine sugar, in 3 additions, beating for 1 minute after each addition. Blend in the extracts. Beat in the eggs, one at a time, beating for 20 seconds after each egg is added.

On low speed, add the sifted mixture in 3 additions with the cream in 2 additions, beginning and ending with the dry ingredients. Scrape down the sides of the mixing bowl with a rubber spatula to keep the batter even-textured. The batter should be smooth and creamy.

Pour the batter into the prepared tube pan. Gently shake the pan from side to side to even out mixture. Bake the cake for 1 hour 20 minutes to 1 hour 25 minutes or until cake has risen, set, and a wooden toothpick withdraws clean when inserted.

Let the cake stand in the pan on a cooling rack for 5-10 minutes. Invert the cake, remove pan and paper, and place an additional sheet of waxed paper under the rack to catch any drips of glaze.

To make the glaze:

Place the sugar, water, and reserved vanilla bean into a small saucepan. Cover the saucepan and set over low heat. When the sugar has dissolved, raise the heat, bring contents of pan to a boil, reduce the heat so that the mixture simmers actively for 3 to 4 minutes. Add rum and simmer for an additional 30 seconds. Remove the vanilla bean pieces. Stir in the extracts. Pour into a bowl and let stand until you are ready to use.

With a soft pastry brush, paint the glaze over the top and sides of the still-warm cake. Cool the cake completely before cutting into slices and serving.

Pin It

I love a good sandwich; but I am also picky about them. The bread has to be excellent, toppings carefully selected, and any of my long-time readers know how finicky I am about ratios. But when the sandwich has each of those things going for it, it can be a thing of beauty. And I am not alone in thinking this, Nancy Silverton in her fabulous book, Nancy Silverton’s Sandwich Book echoes these sentiments, and gave me an outstanding midday meal.

A sandwich to be savored, with care placed in both the ingredients, and the composition, this sandwich of Soft-Scrambled Eggs, Long-Cooked Broccoli, and Feta Cheese was perfect. Nestled on grilled sourdough bread, the crowning achievement to this lunchtime meal was of course, the long cooked broccoli. Now I have eaten plenty of broccoli in my day. In fact, it was my favorite vegetable as a child. But I had never eaten broccoli that had been cooked for hours, each floret soaking up luscious olive oil like a sponge.

Granted, the broccoli is not the prettiest of things after its hours of cooking, but it just may be the most delicious. Who knew that withered, brown, and desiccated could actually be complimentary words? Slightly piquant from cooking with a dried red chile, and squeezed with a touch of lemon juice, the broccoli proved to be the ideal foil for the other toppings. The creaminess of the small-curd, soft-scrambled egg was perfect. The saltiness of the freshly crumbled, French Feta cheese was magnificent. Top the entire sandwich off with a grinding of black pepper and a sprinkling of minced chives, and forget finishing off this sandwich with yet another slice of bread– you have to see this sandwich in all of its glory!

Is your mouth watering yet? 

Served open-faced, on grilled sourdough bread, and topped with soft-scrambled eggs and French Feta cheese, this broccoli is amazing. It is deeply savory, and I think would make a superb side dish, or a smear for crostini also. When you find a stupendous recipe, like this one, the options are endless.

Long Cooked Broccoli
from Nancy Silverton’s Sandwich Book

1-2 head broccoli, about 1 3/4 pounds
1/4 cup plus 1 teaspoon kosher salt
4 garlic cloves, peeled and thinly sliced
1 small onion thinly sliced
1/2 cup olive oil
1 whole dried chile

Trim and discard the bottom inch end of broccoli stalk. Peel the remaining stalk, and cut it off, leaving about 1 inch of the stalk still intact on the broccoli florets. Slice the remaining stalk into 1/4 inch by 1 inch pieces. Cut the broccoli into 1 inch florets. Set aside.

In a large pot, boil 8 cups of water. Add 1/4 cup of salt. Cook the cut-up broccoli in the boiling water for 2 minutes, or until bright green. Drain the broccoli, and place in a large bowl of ice water to chill. Drain again when chilled, and pat dry with a kitchen towel.

In a large, heavy-duty skillet, combine the broccoli, garlic, onion, olive oil, chile, and 1 teaspoon of salt. Over very low heat, cook the broccoli, stirring occasionally, for 1 1/2 hours, until very soft and tender. Taste for seasoning. Arrange on slices of grilled sourdough bread and squeeze with lemon. Top with softly scrambled eggs, and crumbled Feta cheese.

Pin It
May 11th, 2006

Brown Suede Cupcakes

I admit it, there is nothing I like more than a good Red Velvet Cupcake with Cream Cheese Icing. I also admit that all that red food coloring, the very coloring that gives the cake its charming name, kind of gives me the heebies. The way that it colors your fingers when you pick the cupcake apart, the way it leaves an incriminating red mark on your tongue long after you have consumed the sugary goodness, and really, just the idea of eating all of that food coloring, despite the delightful sweetness of the cupcake– puts a bad taste in my mouth. And so, when faced with the stunning problem of what do when faced with desire to have the cupcake, without all of the mess, I decided to make Brown Suede Cupcakes.

The Red Velvet Cupcake minus the red food coloring, proved to be just the thing to cure my sweet tooth, all the while maintaining the rules of my finicky palate. A Red Velvet Cupcake is simply a butter-heavy batter, tinged with cocoa, giving the cake only a slightly chocolatey flavor. When baked up (minus the food coloring), the cake is moist and light, with just a hint of chocolate’s color and flavor. What is the opposite of Red Velvet? Well, it’s Brown Suede. And don’t ask me why.

Although I may be breaking with tradition– perhaps you are supposed to get rosy fingertips, and a shockingly pink tongue when eating your dessert. But if you’re anything like me, and do not desire the evidence of your dessert long after you have eaten it, then Brown Suede Cupcakes are the way to go.

Pin It

I am a miserable shaver. Perhaps I am not as diligent as I should be; or maybe it is that I am always in too much of a hurry, whisking a sharp razor up and down my peaked legs; but whatever it is I just can’t do it well. Each time I step into the bath, steam curling calmly at the surface of the water, I lather up my legs with shaving cream, and begin the process, the cream is zipped off with every course of my bright pink razor. The job is done, all looks well, and I emerge from the bath, and begin to dry off. Then the minute cuts turn into gushing, sanguine rivers of blood. I dab with a tissue, try putting on lotion to stop the hemorrhages. The bathroom looks like a crime scene. I cannot shave my legs. But what I can shave, are vegetables, and here is how:

I own a mandoline. Not one of those super-duper, fancy-schmancy sorts, just a good mid-range one; and I love it. It waffle cuts, crinkle cuts, and shaves thinly, but truth be told, I really only use the shaving and slicing attachments. In the spring and summer, when fresh produce abounds, I eat a lot of salads. Now these are not your typical, dietetic salads served with a wedge of lemon. One of my favorite things to do with my trusty mandoline, is to slice thinly, and serve vegetables raw, that are typically served cooked.

Case in point, this simple salad, composed of baby arugula, curls of parmesan cheese, and shavings of raw, baby artichokes. Cleaned, sliced in half, choke removed, then rubbed with a lemon to prevent oxidation, these chokes when eaten raw are an entirely different beast. Crisp, nutty, and tasting of spring, these artichokes were the perfect mediation to the peppery arugula. The most challenging aspect to this salad, is keeping the artichokes a sprightly green color upon shaving them. Despite rubbing the entire choke with a lemon, I found that the pieces of artichoke needed a toss in lemon juice immediately after shaving, to prevent oxidation.

Besides that the rest of the salad couldn’t be simpler, just the way I like to eat in the warmer months. Arugula was tossed with the artichokes, some flavorful, green olive oil was added, and a splash of balsamic vinegar, bringing out the sweetness of this salad. To prevent the cheese from getting slimy, it was added at the last moment– post-dressing. Shaving veggies is a wonderful alternative to the standard, and gives the vegetables new life. I have done it with beets, zucchini, asparagus, all with delicious results. And don’t think that shaving has to be done on pricey mandoline– a good, sharp vegetable peeler works just fine as well. This season I’ll shave just about anything. For my legs, I think I’ll resort to waxing.

Pin It

I can’t really take credit for this idea. I’ll give credit where credit is due– Jamie Oliver did it again. While watching an old episode of Oliver’s Twist, Jamie made a fresh pasta dish: rolled manicotti resting in a dish of raw tomato sauce. Clean, light, and vegetarian, this dish looked delightfully simple to prepare, and was a delicious change from the standard, heavy manicotti.

It’s spring now, I am awoken each morning to the cheery cacophony of birds singing their dawn chorus. Monday, I even spotted the first California grown stone fruit at the market. So manicotti, you may be asking yourself, doesn’t that sound a bit heavy? A bubbly pasta dish can be a bit much to contend with, but this manicotti, is made with fresh, vine-ripened tomatoes. Baked in the oven, the tomatoes only intensify while the rest of the pasta is melting and getting gooshy.

The manicotti themselves couldn’t be simpler. Fresh sheets of semolina-egg pasta, were cut into rectangles. Inside, diced onion, spinach, and marjoram, all sauteed and wilted together, with a healthy grating of spinach’s best friend– nutmeg, were used to fill the sheets of pasta, along with a dose of ricotta and a sprinkling of parmesan cheese. Each rectangle of pasta is then rolled up to make the manicotti.

A few tomatoes were blended together, skin, seeds, and all; a chiffonade of basil, salt and pepper were mixed in, and then the “sauce” was poured into the bottom of a baking dish. The sauce looks very watery when assembled, but have no fear– upon baking, the sauce will be absorbed into the pasta, making an intense tomato sauce. I placed the manicotti in the baking dish, laid slices of fresh mozzarella cheese on top (munching on the remnants), sprinkled the dish lightly with more parmesan cheese, then set it in the oven at 425 degrees, to bake for 30 minutes.

What I retrieved from the oven a half hour later smelled divine, and tasted even better. The tomato sauce had completely incorporated into the rest of the dish; the cheeses were bubbling, with bits of ricotta peeking out of the manicotti, taunting me to dig in; and the mozzarella had turned a golden hue. Whoever said that manicotti is a stuffy, cold-weather dish, obviously hasn’t hung around with Mr. Oliver lately.

Pin It
May 1st, 2006

Creamsicle Hockey Pucks

I know that it may look like a hockey puck, squat and gently rounded, but I assure you that is where the similarities end. What I have instead is a light, eggless Italian custard– a panna cotta. Wobbly, chilled, resting calmly and waiting to be gobbled up, this panna cotta was enriched with buttermilk, giving it a subtle tang.

What to do with leftover buttermilk setting in the fridge? Make a delicious dessert that highlights the buttermilk of course. I love the simplicity of panna cotta. Vanilla, pure and unadulterated was the main flavor in this dessert. A little milk, some sugar, a bit of gelatin, and plenty of buttermilk– it doesn’t sound like much, and it’s not. But when mixed together, the vanilla playing off of the richness of the buttermilk, the gentle jiggle of the gelatin, the cooling presence of the custard, all of the ingredients make for one stellar dessert.

Not one to leave well enough alone, I felt that the panna cotta could be gilded a bit. It needed a sauce, both for color and flavor. I returned to the fridge, and pulled out some freshly squeezed orange juice. Sweetened with a small amount of sugar, I set the O.J. in a shallow pan on the stove and boiled the juice down, until a rich, viscous, syrup was obtained. After unmolding the cooled panna cotta from their ramekins, I spooned some of the nectar onto the dessert plate.

Unwittingly, I had made something that tasted exactly like a creamsicle! The milky goodness of the panna cotta, along with the tart concentration of the orange juice– when I closed my eyes, lifting a bite of dessert to my lips, I was transported back to summer camp and those popsicles– the shock of orange enveloping the sweet iced milk. This adult creamsicle, or buttermilk panna cotta with orange sauce, call it what you will, I would happily eat again.

Pin It
© 2024 wordpress test site
all rights reserved