November 25th, 2005

Gobble Gobble…It Up

I am a Thanksgiving traditionalist. I don’t like anything fantastical at my feasts, and I come from a long line of traditionalists. Parsnip-Potato Puree may be scrumptious any other day of the year, but on Turkey Day it has to be pure– Russet Potatoes mashed with milk and butter and slathered in homemade turkey gravy. For me a ginger-lime rub on the turkey would be sacrilege, I’ll take butter anyday, and I’m getting racy if I add some bourbon to the sweet potatoes. For one day a year I forget about being bourgie, and it’s true Americana at my house.

But this year I borrowed from another family’s tradition and made the weird and wonderful Layered Raspberry Jello Salad. Salty, sweet, and pungent, this is a bizarre trio of flavors– raspberry jello with whole raspberries, Cool Whip, mixed with cream cheese, all plunked on top of a crust of salted, crushed pretzel sticks and butter. Mmmm.

First let me say, I am not one of those people who is ga-ga for jello. It all seems a little strange to me; a clear concoction of sweetened fruit is an alien invention– just eat a piece of fruit. Mixing the cream cheese with the confectioner’s sugar, and blending it with the whipped topping, made my stomach turn, but the layering process was a thing of beauty. Neatly wedged into a clear Pyrex baking dish, then plunked in the refrigerator to set, this quivering mass of white trash goodness came out only hours later and made me giggle with glee. The holiday season had arrived!

What makes this “salad” even more of an anomaly, is the recipe doesn’t even come from a typical American family. My sister had a roommate in college who was first generation American, much of her family is still in Italy, and scattered around the world. They had a huge Thanksgiving feast, replete with an American-style turkey, and many Italian side dishes. They always ate early in the day, and my sister and I would stop by to wish them a happy Thanksgiving before our own feast began. We would bring some fudge that my mother had made the night before, and in return we would get a plate of Italian cookies, and a little dish of Raspberry Layer Salad for my sister and I to share. We loved the stuff!

Those Thanksgivings have passed. It had been years since I had tasted the jello salad, but I thought of it each November, as I was buying up my yams, and sorting through mounds of brussel sprouts. So this year I decided to make it, and it was almost as good as I remembered. It was a little too strange for some people at our Thanksgiving dinner, and that’s fine. They don’t know what they are missing.

Pin It
November 17th, 2005

Chili con Bourgie

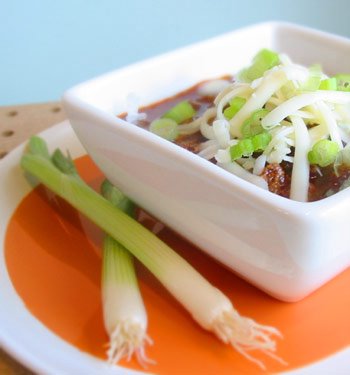
Chili is a food of cooking lore. Days are spent with giant pots simmering away on the stove. Women and men don their American flag aprons and head to the county fair for endless chili cook-offs. Secret recipes are de riguer. I’ve never really understood what all of the hullabaloo was about. Sure I love chili as much as the next girl, but I would be hard-pressed to mention a food that can be consumed in a bowl that I would wait hours, even days to consume.

Even an impatient bourgie loves chili, though there’s nothing too bourgie about this chili. This chili, adapted from Rick and Lanie’s Excellent Kitchen Adventures (I know, I think title is lame myself) was good. Rib-sticking and belly warming with just a touch of heat from ancho chile powder, the chili was a solid 7 on a 10 point scale. Simmered, for just about an hour, and made with ground beef, the chili was relatively quick and equally as simple.

One final question remains, to bean or not to bean…I say, “Bean!” What is a chili without beans? Meat soup. So in this case I opted for the kidney bean. The bean is a thing of beauty, smooth, soft, some would say almost buttery. A perfect orb of protein. I know that you have your chili purists who would say that bean interferes with the perfection of the chile and the beef. But those people would also be the same folks with their American flag aprons. And to those people I throw down my apron and proclaim, “Bean me up, Scotty!”

This recipe is adapted from Rick and Lanie’s Excellent Kitchen Adventures by Rick Bayless. It’s simple, relatively quick, and not too spicy. I felt the recipe needed a lump of sugar, to balance out the acids from the tomato, but taste, and season to your liking.

Chili con Carne
adapted from Rick and Lanie’s Excellent Kitchen Adventures

Serves 4-6

3 tablespoons pure ground ancho chile powder
2 tablespoons olive oil
1 1/2 pounds ground beef
1 medium onion, diced
3 garlic cloves
1- 15 ounce can diced tomatoes in juice
1 teaspoon ground cumin
1- 15 ounce can kidney beans, drained
lump of sugar
salt
2 tablespoons corn meal
grated Monterey Jack cheese, and sliced green onions for serving

In a large saucepan or dutch oven, brown the beef and onion in the olive oil. Break up the meat as it cooks and browns, about 10 minutes. Remove from heat. If a lot of rendered fat is present, drain off.

In the bowl of a food processor add, chile powder, garlic, tomatoes with juice, and cumin. Process until smooth. Pour the seasoning over the meat, return to medium-high heat, and cook the chile mixture for 5 minutes. Stir in 2 cups of water, and a good dose of salt. Reduce heat to medium-low, and simmer for 45 minutes.

Sprinkle in corn meal for thickening, and stir in drained beans. Taste for seasoning, and add in lump of sugar, if using. Ladle into bowls, and top with grated cheese and green onion.

Pin It
November 14th, 2005

The Dinner Oracle

Indecision has happened one to many times in my house. The conversation goes something like this:

Husband: Where do you want to go to dinner?
Adrienne: I’m not sure, what sounds good to you?
H: I’m really game for anything.
A: Well narrow it down, and we’ll choose from there.
H: Well what couldn’t you eat?

You get the picture. It’s all very irritating. (And yes, I realize this is petty, my problems should all be so big.)

Does this ever happen to you? It’s a weeknight, you don’t feel like cooking, leftovers are sounding unappealing, so you decide to go out for a bite. And that’s when it strikes, indecision rears its ugly head, with a giant question mark hanging over its forehead, and you can’t decide what to eat. Will it be Chinese, or that Jewish deli down the street, or something more ascetic like sushi? You just can’t decide. Well, your worries about where to go to dinner can be solved with The Dinner Oracle.

Yes, it’s the Dinner Oracle, the solution to my problems of dining indecision, as artfully contributed by my wonderful, though at times geeky husband (Brian, wave your geek flag high!). It is offered to you, my trusted Nosheteria readers, to get you out of similar dining binds. It’s simple. Enter in the types of cuisines you have a hankering for, and let the oracle decide for you. If there are any types of cuisine that have been shockingly overlooked, leave a comment, and we will try to remedy the situation.

Pin It
November 10th, 2005

Is it Rice or is it Risotto?

It’s neither actually, just a comforting lunch time concoction. I’ve said it before, so I will say it again– My name is Adrienne Handler, and I am a culinary cheat. Call this the cheater’s risotto if you will, I will call it “proudly using up some leftovers.”

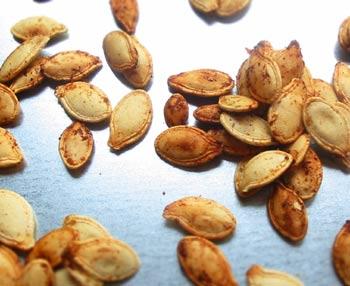
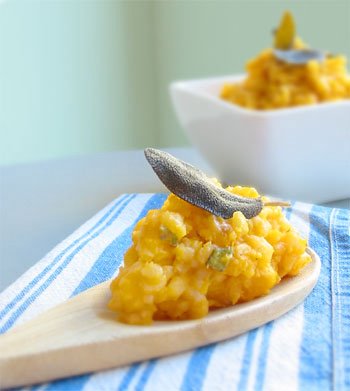
Early in the week I made butternut squash puree by roasting a whole squash for one hour, discarding the seeds, scooping out the flesh, and making a sumptuous puree with chopped fresh sage. I ate the puree as a vegetable side dish during one meal, but as usual was left with quite a bit leftover. You know the saying, “Waste not, want not.” Well I never truly agreed with the aphorism, but for the sake of of this “risotto,” I would find myself swearing by it. Like any good bourgie knows, if you enjoy an ingredient prepared one way, chances are you will enjoy it prepared another. And since it is fall, I say, “Bring on the squash!” in all of its many forms.

The rice dish was made by cooking a cupful of brown rice. Nutty, and chewy, the rice was the perfect foil the smooth, richness of the butternut squash puree. Blend the two main ingredients together and you have a hearty, belly-warming concoction, that looks a bit like risotto, but has the crunch and chewiness of the brown rice, and will make you think that you were back on the commune.

Finally, the “risotto” is mixed with a few tablespoons of butter, (we can’t be healthy all of the time) and topped with crisp fried sage leaves. It seems that I have been on a bit of a frying kick lately. Simply drop sage leaves into a bit of hot oil and fry until leaves are a golden brown. The sage will become crispy, and release their essential oils, making the entire kitchen smell woodsy and herbaceous. Of course the fried sage leaves are optional, but really, what better way to spend an afternoon, then over a ginormous vat of hot oil?

Pin It
November 7th, 2005

Roasted, Simmered, and Fried

Parsnips are a truly underrated vegetable. So often they are relegated to the pantry, along with the potatoes and onion, never to see the light of day. Well, it’s time to claim a resurgence of this winter time root veg! Power to the parsnip! Let’s enjoy the smooth, sweet, and slightly peppery flavor of the parsnip with a simple soup that highlights this wonderful vegetable– Roasted Parsnip Soup with Bacon and Fried Parsnip Curls.


Let’s talk about roasting vegetables for a moment, shall we? I love the simplicity of roasting. It can turn the ordinary into the sublime; it intensifies flavors, making them seem bold. Roasting is rich, hearty, unbelievably simple, the perfect match for a winter time vegetable. So I added the additional step of roasting to this soup. The final product is a soup that is deeply intense, full of the earthy flavors of the parsnip. Sure you could make this soup without roasting the vegetables, but then you would miss out on all of the rich flavors that are unearthed. And who wants to eat insipid soup?

Finally the pureed soup is topped with delicate fried ribbons of parsnip. This is done very simply with a vegetable peeler and some hot oil. Peel strips of parsnip and reserve these strips to fry. In a shallow pan, covered in a half inch of flavorless oil, heated to 300 degrees, sprinkle in a small batch of parsnip ribbons. The ribbons will fry, turning a golden brown, taking approximately 1 minute. Take the curls out with a slotted spoon, lay on a paper towel to drain, and sprinkle with salt and pepper. The curls will be crisp, nutty, and still slightly chewy– the perfect compliment to a smoothly pureed soup.

Celebrate the parsnip in all of it many forms, roasted, simmered and FRIED. Each type of cooking lends a different quality to the soup, and topping the puree with parsnip curls and bacon (because really, what isn’t better with bacon?) brings the soup into that bourgie realm.

Roasted Parnip Soup with Bacon and Fried Parsnip Curls

2 – 2 1/4 lbs. parsnips, peeled and cut into 2 inch chunks
2 tablespoons olive oil
5 strips bacon
2 leeks, white and light green parts only, sliced thinly
3 cloves garlic, sliced thinly
1 stalk celery, sliced thinly
6 cups broth
1 bay leaf
1 teaspoon fresh thyme, minced
salt and pepper

In a preheated 400 degree oven, roast the parsnips, tossed in olive oil, and seasoned with salt and pepper, until golden brown, about 45 minutes.

In a large saucepan or dutch oven, over medium heat, fry the bacon until crisp. Remove the bacon, and reserve, leaving the additional rendered pork fat in the pan. Add the leeks, garlic, and celery to the pan, and saute until volume has reduced by half, about 5 minutes. Add the roasted parsnips, broth, bay leaf, and thyme, turning the heat up to high. Once a boil has been reached, reduce heat to medium-low, and simmer partially covered for 30 minutes. Once 30 minutes have elapsed, taste, and season with salt and pepper. Turn heat off and puree with an emulsion blender, or in small batches with a regular blender. Soup should be pureed, but not entirely smooth. Return soup to pot, and taste for seasoning.

Serve each bowl of soup with crumbled bacon bits and additional parsnip curls.

Pin It
November 4th, 2005

When You're the Second Born

When my parents were starting out, they did things differently than when I came around nearly 10 years after they were married. They BBQ’ed turkeys, made homemade beef jerkey, and even made their own fruit rolls for my sister to snack on. It was the early ’70′s, food dehydrators were all of the rage, and they were looking for a wholesome, inexpensive snack to make for their first born. Five years later, when I came along, dehydrators were passe, and the fruit rolls were a distant memory, but I still heard about the days of dehydrating and I longed for a little bit of dessicated fruit myself.

Here I am, in my late 20′s, and dreaming of a snack of my youth. Sure I buy the fruit leather from the health food store, diminutive roofing tiles dried to a chewy consistency, but they’re not the same. And the Fruit Roll-Ups, dyed unnatural colors, and smacking of artificial sweeteners and flavors, aren’t doing it for me either. My mom has no desire, nor the knowlege of the recipe anymore to work from, in order to make this childhood snack for her very adult daughter.

So it’s off to the internet I go, only to find that fruit rolls are insanely easy to make, so easy in fact, I don’t think that I will ever buy one again. No cumbersome, kitchen cabinet clogging food dehydrator needed, just plastic wrap, a blender, fruit, a bit of honey, an oven, and a few hours to kill. After reviewing far too many recipes on the internet, I took my new, fruit roll making knowledge, and made a go of it on my own, with a final result with which I was pleased.

What was so excellent about making your own fruit rolls was the ability to control what goes into them, and deciding which flavors to make. I chose a basic cherry, and a mixed berry-banana. Banana you say, I didn’t know bananas would work? Really you can make fruit rolls out of just about any fruit you choose. With the change in season, and berries not really being available, I used frozen berries, and they worked out fine.

Simply cover a baking sheet with plastic wrap. (Wetting the baking sheet first helps the wrap stay put.) Puree fruit, thawed to room temperature if using the frozen variety, with a tablespoon or two of honey. This acts as both an emulsifier, and a natural sweetener. Pour the puree onto the plastic wrap lined baking sheet, and spread until one inch from the edge of the sheet, and very thin, about 1/8 of an inch. Place pan in a low, 200 degree oven, and bake until appearance is dry, and fruit is no longer tacky. This can take anywhere from 2-3 hours. Remove from the oven, bring pan to room temperature, and divide into single serving sizes, and roll away.

Pin It
November 1st, 2005

Get Saucy!

Each season I get excited about the gobs of fresh, seasonal produce that abound at the market. Although it is true that in this day in age you can get peaches virtually year round thanks to Chile (though they probably taste like a brick much of the time), and apples are available throughout the year, when fall comes blustering through, and the heirloom varieties of apples begin to line the shelves at the grocery, I want to eat apples, and I turn my nose up at sweet stone fruit.

Sure, an apple is great eaten out of hand when you are brown bagging it. But apples are terrific cooked in a myriad of different dishes. A simple dish that I have come to rely on takes advantage of apples, and their bulbous, buttery sister, the pear. Apple Pear Sauce, sweet, but not cloyingly so, chunky, with bits of fresh fruit bobbing about, and scented with vanilla, makes for an ideal accoutrement for any meal.

Those little flecks of black nestled in the sauce are not in fact microscopic insects, but rather the remnants of a pure Tahitian vanilla bean. Split, seeds carefully extracted and simmered with the fruit, this brings the sauce to a new bourgier level, elevating it from just-a-sauce-to-eat-with-pork-chops, to a, stand-on-its-own sort of side dish. The sweet-tart flavor of the apple is the perfect compliment for the grainy, mellow flavor of the pear, and the vanilla bean fragrances the entire house during the cooking process.

This sauce stays for quite awhile in the refrigerator, and is a wonderful addition to weekday breakfast, or lazy weekend brunches. This makes a ton of Apple Pear Sauce, but this delicious sauce stays, refrigerated, for a couple of weeks, and can be easily reduced by half, if you are looking to make a smaller batch.

Apple Pear Sauce

6 sweet tart apples, like Jonathan, or Jonah Golds, peeled, cored, and cut into
chunks
5 pears, peeled, cored, and cut into chunks
1 vanilla bean, split and seeded
2 cups water
2 tablespoons butter

In a large pot, add the apples and pears. Scrape the seeds from a vanilla bean, and add both the seeds and the pod to the fruit. Pour in the water, and add the butter. Place over high heat, and bring to a boil. When brought to a boil, turn the heat down to a simmer, and continue to cook, stirring occasionally, for 25-30 minutes. After time has passed, fruit should begin to fall apart and soften. If need, with a large fork, or potato masher, break down any remaining cooked pieces of fruit. Sauce will be slightly chunky, with only a little bit of liquid remaining. If sauce has too much liquid for your tastes, turn up the heat, and cook out some of the water. Discard vanilla bean pod, and enjoy.

Pin It
October 27th, 2005

Have a BOO-rgie Halloween!

Halloween is almost here, and that means jack o’ lanterns. And what do all jack o’ lanterns, big or small, jolly or frightful, traditional or bourgie, have in common? Pumpkin Seeds. If you’re anything like me, you only eat them once a year; they are a flavorful treat that tells me Halloween has begun and kicks off the fall/winter holiday season.

Meet Vincenzo Humunculati and Humunculotte Lenya, the jack o’ lanterns that so selflessly gave their insides, their organs and guts, to give me a little nosh in late October. These pumpkins, despite their size, and webbings of pumpkin goo, did not actually have too many seeds, but after rinsing and separating goo from pumpkin seed, I was left with about one cup of seeds to roast and eat with glee.

This year I swayed a bit from the traditional roasted pumpkin seed with plain Kosher salt, and went for something new, something a bit spicy, something to make Vincenzo and Humuculotte proud, Spicy Roasted Pumpkin Seeds. Just as easy as the traditional, with just a handful of ingredients, these pumpkin seeds are warm, a tad piquant, and all together delicious.

Spicy Roasted Pumpkin Seeds

1 cup raw pumpkin seeds
juice of 1 lime
1/2 teaspoon Kosher salt
1 1/2 teaspoons ground cumin

Preheat the oven to 350 degrees. In a large bowl, toss the pumpkin seeds, lime, salt, and cumin well to coat evenly. Place the seeds on a large cookie sheet, and bake, tossing frequently to make sure the seeds don’t scorch, for approximately 20 minutes. Seeds should be fragrant, and toasty brown.

Happy Halloween!

Pin It
October 25th, 2005

Tuna a la Bourgie

I have problems with the ordinary tuna fish sandwich. It is as if all of my food taboos come crashing together in one hand-held mass. Traditional tuna fish can be a globulous, mushy, mayo-filled nightmare, and I just won’t have it! It’s true, I have a problem with mayonnaise. Maybe it’s the Jew in me. So the traditional tuna fish sandwich is out, but that doesn’t mean I have a problem with tuna itself. In fact, I kind of like the stuff, especially in a Tuna Fish Sandwich a la Bourgie.

This is a tuna sandwich with a decidedly Mediterranean bent. Fish packed in olive oil make all the difference. Yes, it is a bit more expensive, but for these few dollars more you get a fresher tasting, more palatable product. It takes the fishiness out of a tuna fish sandwich. Chopped olives, Greek or green, give the sandwich some needed color, and add to the briny flavor. And finally, some finely minced, fresh jalapenos, give this lunchtime treat a piquant kick.

The sandwich is meant to have a bit of heat; so the jalapenos are necessary. But most of the heat in a pepper comes from the seeds and ribs, not the actual flesh. I like my sandwich to be moderately spicy, so I use a pepper and a half, minus the seeds. But is you are a heat fanatic, go ahead and chuck in the entire pepper. It is important to taste jalapeno peppers for spiciness before cooking with them. I have had jalapenos that almost taste like an ordinary green pepper, and others that will blow your head off. The only way to know what your cooking with, is to taste a little bit raw.

Finally, the sandwich is topped with slices of hard-boiled egg, and nestled upon a bed of peppery arugula. This sandwich is best served on a fresh baguette, to round out a perfect meal.

Spicy, and briny, it is the perfect alternative to a mayonnaise-laden, tuna fish sandwich. The following recipe is for the complete tuna fish sandwich.

Tuna a la Bourgie

Serves 2-3

1- 6 oz. can tuna fish packed in olive oil, drained
1-2 jalapeno pepper, finely diced, seeds removed for less heat
6-8 Greek or green olives, chopped
1 1/2 tablespoons olive oil
salt and pepper
2 hard-boiled eggs, sliced
arugula, cleaned and dried
baguette, sliced horizontally

Mix the tuna, jalapenos, olives, and olive oil, together with a fork, breaking up any large chunks of tuna. Season with salt and pepper. Take sliced baguette, and place in a bed of arugula. Drizzle with additional olive oil, if desired. Spoon in some of the tuna salad, and spread evenly. Top with sliced pieces of egg. Close sandwich, press firmly together, and enjoy!

Pin It
October 20th, 2005

Pudding Please

After my latest delectable baking experience, I was left with a conundrum of vast proportions. What to do with the scraps of cake left behind when cutting the diminutive babycakes from the sheet-cake sized pan? The cake was moist, delightfully sunny in color, toasty brown on the edges, and simply crying out for something to be done with the scraps. It only took a moment, before the bits of cake were piled into a Ziploc bag, and I knew they were destined for something comforting and delicious, Cake Pudding.

I love bread pudding, except when it has raisins in it. Dried fruit should be kept to trail mixes. So why not use scraps of cake (thankfully with no raisins), those wonderfully crisp edges that have settled in the corners of the pan, instead of the bread, for cake pudding. Now I know, this isn’t a dessert that can be made often, because really, how often does one have piles of unfrosted cake with which to assemble it? But the next time you find yourself with left-overs from one sweet dessert– why not make another?

I left my cake scraps to sit for a few days, while I was finishing and digesting the babycakes, I didn’t want to overload on decadence. At the market, I caught the last of the late harvest peaches, peeled, sliced and added to the pudding, they were a tasty foil for the richness of the custard. I made a simple, unsweetened custard, figuring there was enough sweetness in the cake alone, popped the pudding in the oven, and in a half hour I was tucking in to the ultimate comfort food. The cake pudding was surprisingly not too sweet, yet warm, and silky smooth in texture. And I felt very industrious (even though truly I am not) to be able to bake two tantalizing desserts from one recipe for a basic yellow cake.

Pin It
© 2024 wordpress test site
all rights reserved