June 3rd, 2010

The Kitchen Sink

It all started with some leftover New England (split down the middle) hot dog buns from a weenie roast last week. Or maybe it was our first CSA pick-up and a small bunch of of almost chartreuse, baby dill. Correction– it could have been the radishes, straight from the ground in our small vegetable garden. But what about the green garlic that I bought at the farmers market, so bright, and simply hinting at the pungency to come? It could have been that. Or maybe at was a mixture of all of those things that led to one delicious fish sandwich.
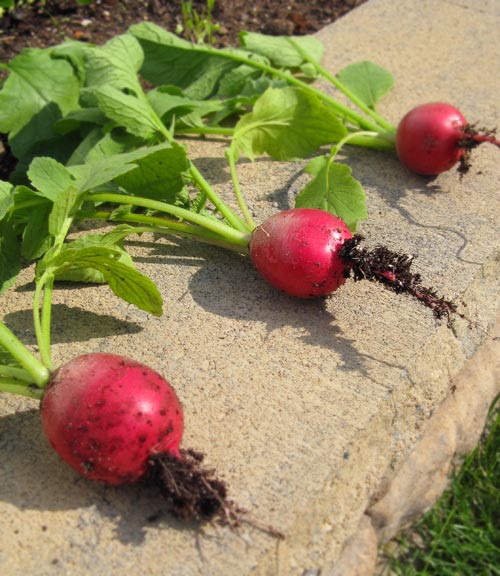
Remember the tomato fiasco of 2009? Those tomatoes would just not ripen. Well, Brian and I are trying again; but this time we’re putting the vegetables in the ground. We have peas, arugula, some tomatoes (keep your finger crossed), and radish. The radish is by far the most gratifying. We plunked them in the soil in early May, and four weeks later, big, beautiful vegetables appeared. Almost instant gratification. I picked a few, and julienned them on my mandolin, and then set them to marinate in olive oil, salt and pepper.

Then I hard-cooked a couple of eggs. I had a few scallions, so those were chopped and set in a bowl. The green garlic was lightly sauteed in olive oil; then that went into a the bowl with the scallions. I pan-fried two Tilapia filets, after dredging them in flour and bread crumbs. (Tilapia is sort of bland– I know– but it is perfect for fish sandwiches and tacos.) I then shredded the Tilapia, and added it to the scallions and garlic. I dumped in the radish, chopped the eggs, which made the mixture creamy, squeezed in a lemon, and seasoned well with with salt and pepper.

I toasted the buns, which incidentally were the perfect foil for this flavorful sandwich, and packed a healthy serving of the salad into each one. I then tore some of the fresh dill on top. The sandwich had a little bit of everything in it; some might say everything but the kitchen sink. But I would say, my kitchen sink never tasted so good! The sandwich was creamy (with no mayo!), lemony, and crunchy from the radish. But most of all, it tasted of spring.

Pin It
May 20th, 2010

A Hill of Chips

My step grandmother always called them tor-till-a chips, with the second syllable rhyming with hill. She lived in Missouri, but was born, and lived for the first half of her life in Germany. She was rather persnickety, and very set in her ways. When I was a child, my mother and I flew out to Missouri one summer for a visit. She rented me a stack of Ramona video tapes from the library, and tried to fill her house with kid-friendly snacks– like tor-till-a chips. As Hedy was showing me the snacks she said, “And here, I bought you some tor-till-a chips.” I looked at her inquisitively and said, “You mean tor-tee-ya chips, right?” But it made no difference. Her house, her pronunciation.

Over the next week, I made a big deal whenever I would go to kitchen cabinet to get a bowl of tor-tee-ya chips. And every time I did, my pronunciation would be met with Hedy’s pronunciation. We were having a tor-till-a/tor-tee-ya chip war. Needless to say, I lost the battle. (Which I probably should have, as Hedy saw it, I was a know-it-all kid from California.) And now, over twenty years later, I still hear her heavily accented German voice clucking tor-till-a, whenever I make tortilla chips.

Baked Tortilla Chips

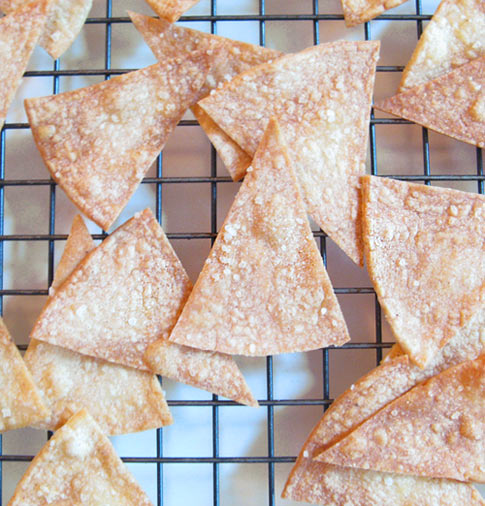
This week, I had one of those large stacks of corn tortillas from the Mexican market leftover from a taco dinner and they were just waiting to be used. So I made chips. But as delicious as fried chips are, I didn’t want to stand over a vat of hot oil to fry up a snack– so I baked them. You know what, I think I may like them even better. The chips are sturdier, thicker, corn-ier– perfect for dipping in salsa, or making nachos with.

Here’s what I did: Preheat the oven to 350 degrees. Take a stack of corn tortillas, and depending on size, slice them into six or eight wedges. Liberally paint a baking sheet with olive oil. Lay the wedges in a single layer on the sheet and paint the tops with more olive oil. Sprinkle with salt and bake for 15-20 minutes, rotating the pan halfway through the baking process. The chips will begin to bubble and then turn brown. Cool on a rack.

These tortilla chips are easy and delicious, however you choose to pronounce them.

Pin It
May 11th, 2010

I Eat a Ton of Salad

I’ve been doing a bit of spring cleaning on my website. To tell you the truth, it’s not the most gratifying thing in the world. When you clean your apartment, or your closet, there is immediate gratification. There are bags to be taken to Goodwill; every glass surface sparkles back at you; and if you are truly anal, there may even be vacuum tracks left on the newly pristine carpet. The gratification when fixing up the website is not nearly so visible. The only thing I have to show for it is a large amount of code– not that I ever knew what it did in the first place.

I’ve made some changes, like adding categories, tags and a more robust search. I think when all is said and done, the site will be easier to use. I’m in the process of categorizing everything. I’m over half-way complete, and I’m hoping you’ll have more luck searching for recipes, and even discovering some you hadn’t known about.

Most likely, you will be searching for salad– because apparently that is all I eat and “cook.” When searching, go to the vegetable (or fruit at times) category, and I have tagged all of the posts, salad. Daikon salad? Done it. Thai melon salad? Got that too. What about three bean? That’s there also. Salad, salad, salad. I heart you.

Happy searching!

Pin It
April 28th, 2010

Ramps For Me

Last Saturday, a dear friend dropped by unexpectedly and delivered a fabulous, edible present that was local– very local. It wasn’t honey, or fish caught in the Sound, it wasn’t even a vegetable that he had cared for and grown on his patio. It was something that he had foraged. I’m not even sure why, but this made it all the more exciting– I was thrilled! Inside an old shopping bag, was a jumble of dirty ramps, the roots still clinging to the rocky soil in which they were buried.

For those of you who are not familiar with ramps, they are also called wild leeks, but I think that they have a taste all their own. It is a bit like green garlic– delicate and highly fragrant. However, they are far too pungent to be eaten raw. But when cooked they are mellow and sweet, recalling the flavors of onion and garlic.

Now I had cooked with ramps before, but they had always been purchased at a farmers’ market. I let my local farmer do the dirty work for me. When we lived in New York, I would buy them during the few short weeks of availability at the Union Square Greenmarket. There they would be virtually clean, tied together with a rubber band, and laying in piles in a wooden crate. They were rather expensive– but now I an see why. My friend had been on a hike when he had noticed the willowy, green stalks sprouting up all around him. He bent down to pick a few. He tugged, and the buggers would not budge. He dug, freed the stones that clung to the roots, and after a few moments was rewarded with a single ramp. From what I understand, foraging for ramps can be an arduous task.

But from his labor, I reaped the rewards in the form of a ramp gratin.

ramp gratinThese ramps were beautiful– plump white bulbs with pristine greens unfurled like a beacon of spring. And another wonderful thing about this gift? They were plentiful. In the past I have been rather stingy when it came to my ramps. I would grill them in a drizzle of olive oil and a sprinkling of Kosher salt. Each diner would get a few. But with my abundant delivery, all of this changed.

After cleaning and trimming my ramps, I blanched them in boiling, salted water. I then cut them into sizable pieces, and set them aside while I made a bechamel sauce out of milk and a bit of the blanching liquid. I wanted to make sure that I didn’t lose one bit of the garlicky-green onion flavor. Carefully I folded the ramps into the bechamel, sprinkled with fresh breadcrumbs and a grating of Parmesan cheese and popped the gratin in a 375 degree oven for 20 minutes, until it was piping hot and bubbling.

Then I dug in. I even shared some with my husband. So now I wonder– what will my friend deliver to me next?

Pin It
April 13th, 2010

So Tart It Must Be Spring

I have officially packed my winter clothes away. Brian and I had a bread salad with dinner on Sunday night. I am nursing blisters on my feet from wearing shoes without socks for the first time in months. Spring is in the air– and that means rhubarb!

I picked up my first few stalks of the season last week, and they were lovely– so astringent, beautifully pink, with just the right amount of pucker. I made a bit of compote with them. No, not the compote that is dowdy, and full of dried fruit. This compote was bright and cheery, scented with vanilla with just a kiss of sugar. I ate it as a topping for Greek yogurt during the week, and then had it as a scrumptious embellishment for buttermilk pancakes on the weekend.

The recipe is over on iVillage. Happy Spring!

Pin It
March 30th, 2010

Happy Passover!

I know that I’m a day late, but for all of those readers who are observing the Passover holiday, and eating only non-leavened bread products– you have an entire week to eat plenty of matzos. One whole week with nary a slice of bread to be seen. Truth be told, it’s been several years since I have been an observant Jew. But I remember in elementary school, my mother packing my lunch for me. I would open my lunch box only to find a peanut butter and jelly sandwich on not homemade white bread, not bread at all– but matzos.

Those were some dry sandwiches! At first, having matzos to snack on seemed special. Like being a member of some secret society. I would pull the brittle pieces out of a sandwich bag, and my non-Jewish schoolmates would ask a slew of questions. I would explain about Passover, the Seder plate, the ritual of the food, and most of all– the matzo. Biting into my “sandwich” and having it splinter and shatter into a million pieces, was part of the holiday for me. But by day three, these sandwiches got a bit old. I grew tired of the peanut butter turning entirely to glue and sticking like a retainer to the roof of my mouth.

Maybe I would have felt a little different about the whole matzos thing, if I had been eating these matzos:

Last week, Mark Bittman published this recipe for homemade olive oil matzos developed from a Sardinian flat bread called carta musica in The New York Times. It looked so simple that I decided to give it a try. Am I glad that I did! This “bread” was delicious.

Of course, being flavored with olive oil may not be the traditional thing, but this is the type of bread/cracker that I would make even if it wasn’t the Passover holiday. The olive oil makes the dough smooth and sumptuous, and it rolls out like a dream. Upon baking, the dough blisters and bubbles, giving it the airiness and crispness that true matzos has. And the flavor is unadulterated and flavorful.

Perhaps if I had known about these olive oil matzos years ago, eating a week’s worth of matzos would have been a pleasure.

Pin It
March 17th, 2010

Naughty and Nice

I was at the heath food store recently, perusing through the many bags of Bob’s Red Mill products when I spotted a bag of graham flour. Graham flour? Graham crackers, I thought. So, I grabbed a bag and went home.

Some may think of graham crackers as a childish food. And I suppose they are. I remember sitting around diminutive work tables in elementary school, with a Dixie cup full of apple juice and a teacher’s assistant placing graham crackers on the paper napkin in front of me. I loved the snack then, and I love the snack now. Graham crackers are still one of my go-to snacks when nothing else sounds good. Slathered with peanut butter, they can’t be beat. And I only could imagine that they would be superlative when homemade.

I went home, and did a quick Google search for graham cracker recipes, only to find that today’s graham crackers aren’t even made with graham flour. Sweetened with honey, and made golden with brown sugar they sounded like they were delicious biscuits, but not necessarily wheaty treats. I held the package of graham flour in my hand, dusty and the color of a morning cup of coffee with too much milk, and decided to simply substitute some of the all-purpose flour for graham flour.

They were delicious, and like I had guessed, far superior to the packaged crackers of my youth. With the addition of the graham flour, they were coarser (in a good way), and more substantial– the perfect afternoon snack. I left some plain, and dipped the rest in Belgian milk chocolate. The richness of the chocolate played nicely off of the gentle sweetness of the cracker.

The following recipe makes quite a few crackers. And the dough remains fresh in the refrigerator for quite a few days. In fact, I made two batches. The first recipe I rolled and cut by hand into more conventional rectangles. Later, I used a biscuit cutter, and made dainty circles– either way you do it is fine.

Graham Crackers
adapted from Nancy Silverton

1 1/2 cups flour
1 cup graham flour
1 cup dark brown sugar, packed lightly
1 teaspoon baking soda
3/4 teaspoon kosher salt
7 tablespoons unsalted butter, cut into one-inch cubes
1/3 cup honey
5 tablespoons milk
2 tablespoons vanilla extract

In the bowl of a food processor, combine flours, brown sugar, baking soda, and salt. Pulse until blended. Add the butter, and continue to pulse the food processor until a coarse meal is obtained.

In a small bowl, mix the honey, milk, and vanilla extract. Add to the flour mixture , and pulse until the dough barely comes together. The dough will be soft and quite sticky. Place on a well-floured piece of plastic wrap. Flatten the dough into a rectangle, one-inch thick. Wrap dough, and chill until firm, at least 2 hours or overnight.

Divide dough in half, and return one half to the refrigerator. On a well-floured surface, roll out the dough to 1/8 inch thick. Dough will be sticky, use plenty of flour. With a pairing knife cut rectangles 2 by 3 inches, or use a round biscuit cutter. Place crackers on a parchment-lined cookie sheet and chill dough for 15-20 minutes in the freezer. Repeat process with the other half of the dough.

Adjust the racks in the oven the upper and lower third. Preheat to 350 degrees. Remove the crackers from the refrigerator, and poke several times with a toothpick or skewer to ensure flatness of the cracker upon baking.

Bake for approximately 20 minutes, rotating the baking sheets at 10 minutes to ensure even baking. Remove from oven, and place on a rack to cool. If desired, dip cool crackers in milk chocolate, melted in a double boiler.

Pin It
March 4th, 2010

I'm back…

I was in California visiting family for a bit. When I got back, I promptly got a cold. Isn’t that always the way? It’s funny to go back to California; it is not my home anymore. And it finally has stopped feeling home– at least my home anyways. But I lived there for so long that it definitely doesn’t not feel like home. Dizzying, I know.

Because of this almost-home feeling, there is no pressure to do things, see stuff, wake up early and hit the tourist destinations. But I came back to Connecticut with California booty just the same. They weren’t snow globes with the Golden Gate Bridge in them, or a UC Berkeley hoodie, they were even better. Here is what California means to me in food.

Blue Bottle Coffee- The single-best roaster that I have found. They used to hand-deliver beans to our apartment in Berkeley every week. That was before they got super popular. Delicious, soulful, rich, I bring back beans every time I visit my parents. I know I could get them shipped, but it wouldn’t be the same.

Citrus fruit- Cara Cara oranges, they’re mild and sweet, with less acid than Navels. A few of these were squirrelled away in my suitcase next to some beautiful, soft-skinned Meyer lemons. I didn’t even have to buy the lemons. They were given to my mom by a neighbor who has a tree. Now that’s local!

Okra snacks- Fried okra treats, from Berkeley Bowl, one of my favorite markets. I went there four times this trip, I was in CA for nine days. Need I say more?

See’s chocolates- The chocolate of my childhood. Hell, this would be the chocolate of my adulthood too, if I still lived on the west coast. You can take your Godiva any day, I will gladly take a morsel of See’s. Just the right amount of milk, softly sweet, indulgent buttercream. I may just have to break into box number two when I finish this post.

Some people bring back trinkets from their vacations, I bring back food. While I may not have a memento to remember this trip by, I certainly will have a happy belly.

Pin It
February 10th, 2010

20 Years

In elementary school, did you ever start an avocado plant from the pit? I did. I remember waiting for weeks, as the stone steeped in tepid water, for the roots to burgeon, and a spindly plant to sprout. But I don’t really remember much past that point. I don’t remember planting the pit in soil, or watering it, or most of all, an avocado tree actually growing. Maybe that’s because this takes 15-20 years. Yep, you read that right. 20 long years!

As daunting as that figure seems, and as unfortunately black as my thumb is, I have not been deterred from forcing my very own pits. I have always felt rather moderately about avocados. I could take them or leave them. But did you know that California grows 90% of all the avocados that we eat in this country. That is a lot of fruit! It forced this once-California girl to take notice.

Perhaps it is a bout of homesickness, or the fact that as I write this post, the Connecticut snow falls softly onto the chain-link fence outside my window, but it makes me long for a bit of California, right here in New Haven. So, I bought a few avocados, even though they’re hardly a local fruit, gobbled them up, stuck the pits with toothpicks, and plunged them into some water.

Now comes the waiting game. It could take weeks for the pits to root and even longer for a plant to sprout. I will be patient, but I also won’t hold my breath. But if all goes well, just think of what a delicious salad awaits me when I am 51.

Pin It
February 3rd, 2010

Mashed and Then Some

I love mashed potatoes, always have. When I was young I even appreciated potato buds. You know, those dessicated flakes of potato to which you add boiling water and a pat of butter? I even liked those. Guilty. I have always loved their warmth, their smooth consistency– for me, mashed potatoes are the ultimate comfort food.

LinkWell, nowadays my palate has become a wee bit more sophisticated than it was when I was seven. I still love mashed potatoes, but now will eat them mashed with buttermilk, with a sprinkling of chives, with the skins on, or even– mashed with another vegetable. Take celery root for instance, that often ignored vegetable sitting at the market next to the other root vegetables. It’s delicious!

This knobby vegetable is crisp when eaten raw, supple when cooked, and tastes like celery, without all of those pesky strings. Simmered with a waxy potato, like Yukon golds, and roughly mashed, this puree makes yet another ideal comfort food. My recipe for this puree is over at iVillage Food.

Pin It
© 2024 wordpress test site
all rights reserved